WordPress Errors
Struggling with WordPress errors can feel like navigating a minefield. You may even make things worse, by trying to fix them without understanding the underlying cause or proper troubleshooting steps.
WordPress powers over 40% of all websites on the internet and has a vast community. This means that the error you’re seeing on your site has likely been reported and resolved by someone before you.
This comprehensive guide addresses the most common WordPress errors and provides straightforward solutions (one by one) that will help you restore your website quickly.
No fluff – just actionable steps to tackle these challenges head-on.
At the end of this guide, you will be able to:
Proceed cautiously, minimizing the risk of worsening issues and the need for expert assistance.
Decipher WordPress error codes and HTTP status messages to quickly identify and address underlying issues, restoring site functionality.
Tackle certain issues caused by incorrectly set PHP memory limit, or PHP variables to improve site stability and performance of your WordPress website.
Important: I highly recommend you backup your WordPress site before attempting to fix any WordPress error using the Updraft Plus plugin. Even experienced WordPress developers can make mistakes when fixing errors, so having a backup will give you peace of mind.
Let’s dive right in!
White Screen of Death (WSoD)
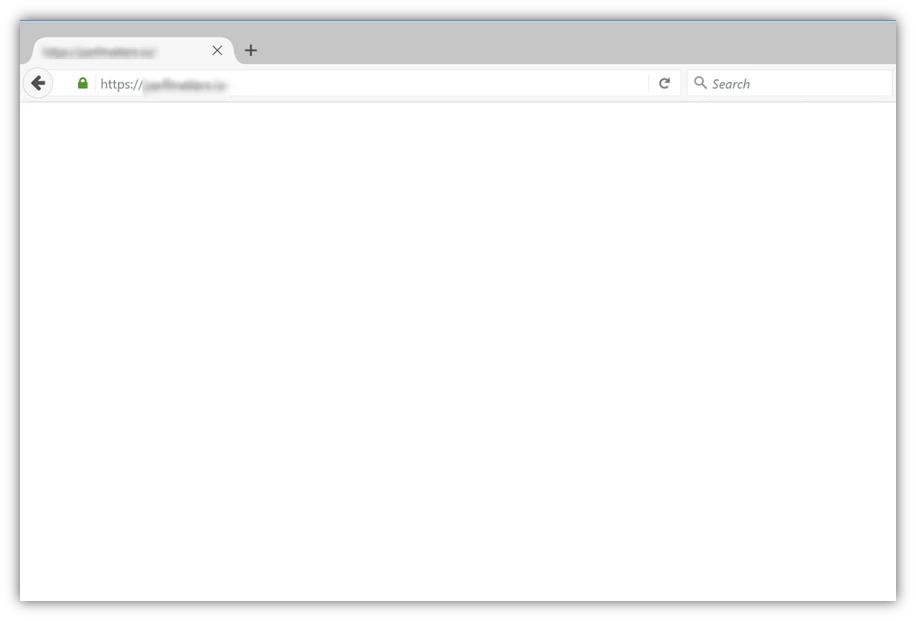
This issue is one of the most common WordPress errors, and possibly the most famous one, where a blank white screen appears instead of the expected website content.
What Causes White Screen of Death?
This problem typically arises due to PHP errors (particularly HTTP 500 internal server error), or PHP memory limit exhaustion. PHP errors can originate from various sources, making them challenging to identify and troubleshoot.
How to Fix White Screen of Death in Wordpress?
Fixing White Screen of Death is easy if you have FTP access or Control Panel login to the website. You may contact your hosting provider if you can’t find your credentials.
Once you have the credentials and login, proceed to public_html folder (your WordPress site root folder) and find wp-config.php file.
Download and open it with your favorite text editor. Alternatively, you can edit it using file manager of your control panel.
Towards the bottom of the file, find the line with WP_DEBUG and change the value to true as follows.
define('WP_DEBUG', true);If you used the FTP client, re-upload the file back to public_html folder. This will enable WordPress to print out the PHP fatal error that causes the white screen.
Refresh your WordPress website now and check if it displays any error message that starts with a fatal error.
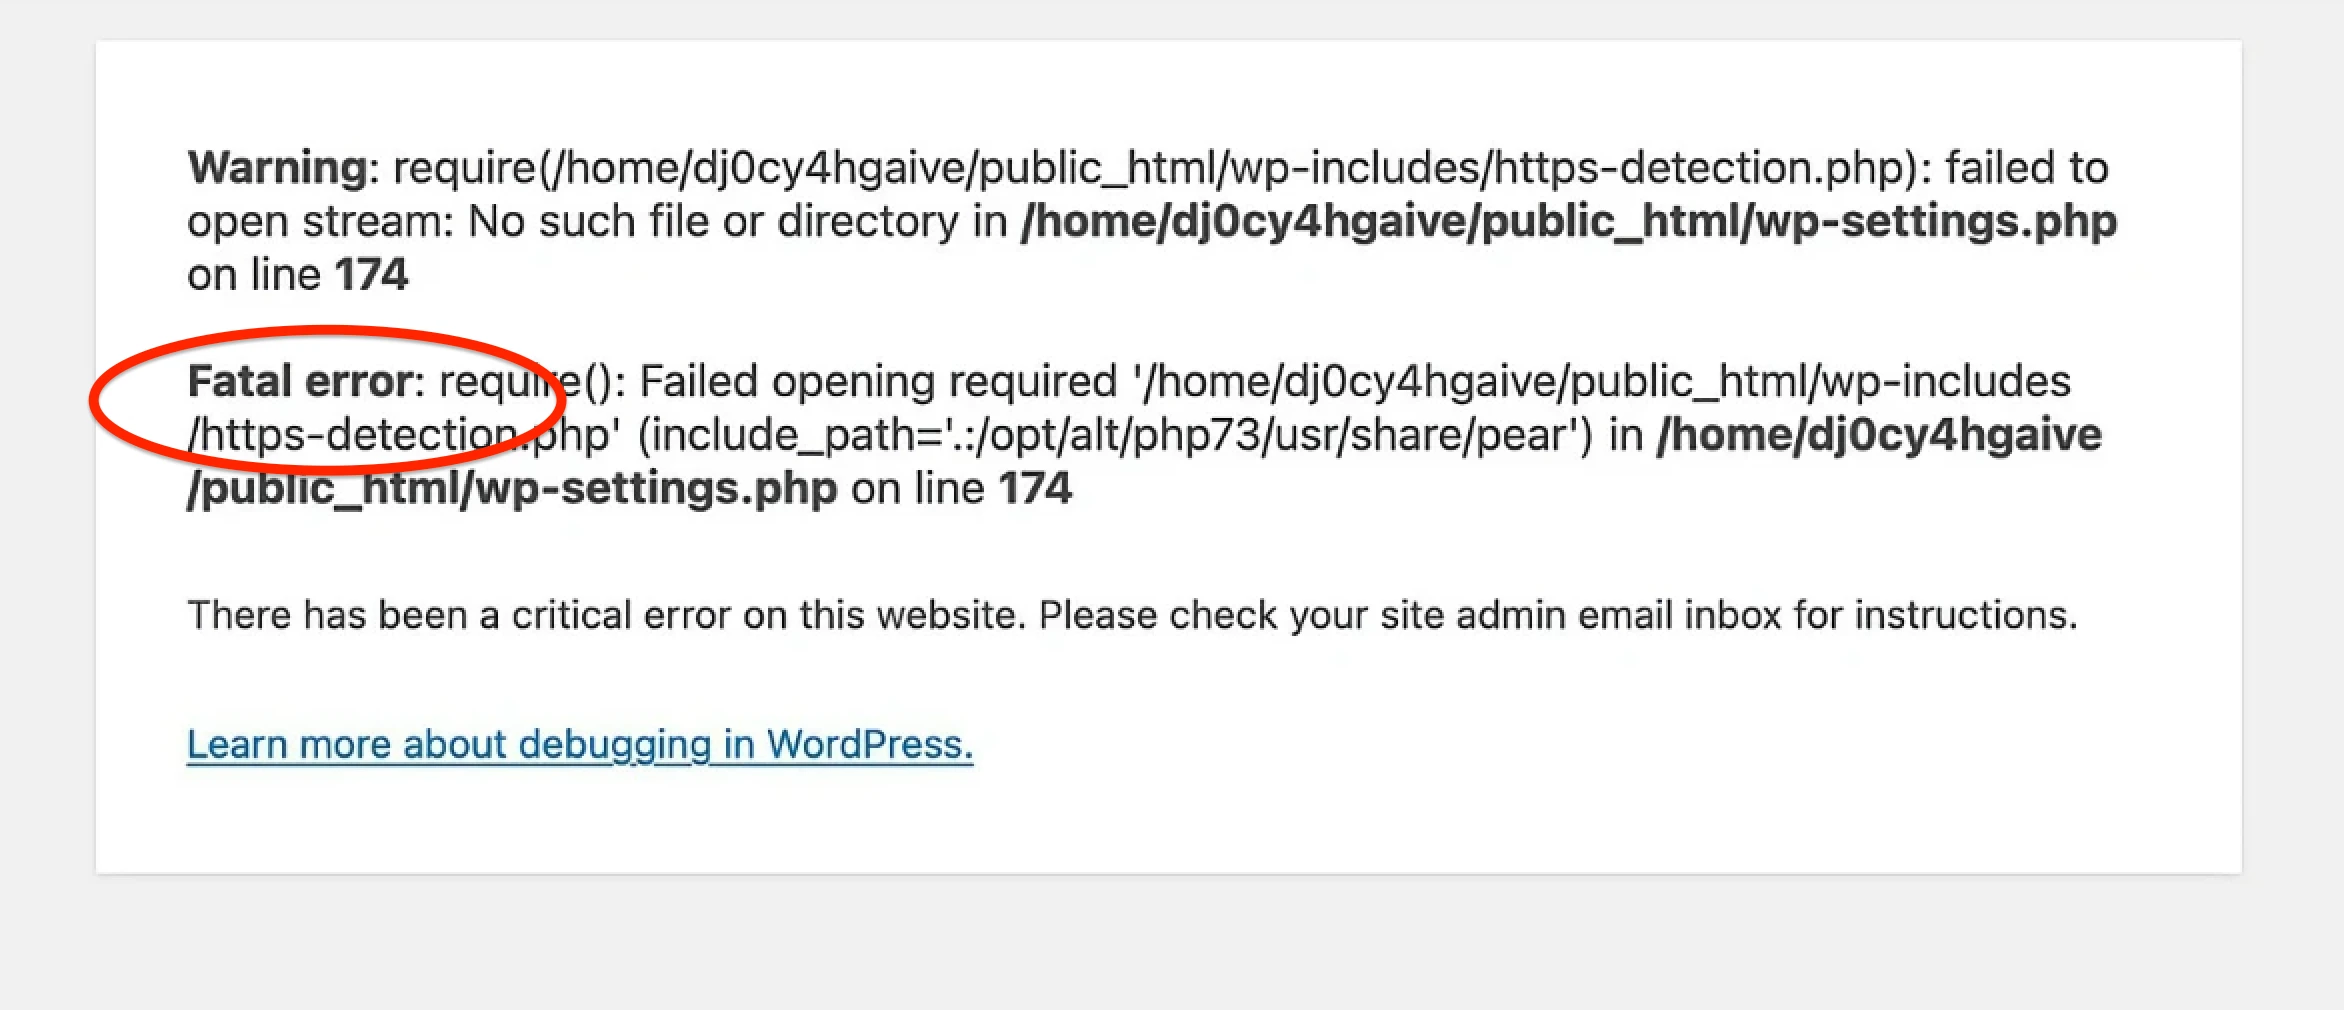
This will reveal which plugin, theme or wordpress core file is causing the error. Just follow the path of the file in the error details.
For example, if the filepath contains wp-content/plugins/plugin_name then the issue is sourcing from that “plugin_name”.
As final step, using FTP client or File Manager, navigate to the path that the error points to and rename the folder of the plugin to something else, such as “plugin_name_bad”. This causes that plugin to be deactivated by WordPress.
Refresh your website again and check if it is back online. It’s normal for you to see PHP warnings. Those are not critical PHP errors.
We now need to switch the WP_DEBUG parameter back to false in wp-config.php to hide PHP warnings and any other debug text.
define('WP_DEBUG', false);What Next?
If the problem is sourcing from a plugin, check if you are using the latest version and update if necessary. You may also search further at the plugin’s official support forum at wordpress.org
If problem is due to the lack of PHP memory limit, then you should increase the limit to at least 512MB using your control panel (MultiPHPEditor in cPanel), or via php.ini file (sometimes user.ini, depending on your web server configuration) using the following command:
memory_limit = 512M;If the problem is not directly related to a plugin or PHP memory limit, then it could be due to a conflicting code in your theme, WordPress core, or web server environment. In that case, search popular resources such as Stack Overflow, or seek help from a professional.
Key Takeaways
Enabling WP_DEBUG will point you in the right direction in troubleshooting WSoD and internal server error issue.
When you remove the conflicting code either by disabling a plugin or changing your theme to a default Wordpress theme, your website should become accessible.
This Site Is Experiencing Technical Difficulties
Similar WordPress Errors with the Same Cause
There has been a critical error on this website. please check your site admin email inbox for instructions.
The site is having technical issues. Please look in your site admin email inbox for further instructions.
What’s the Issue?
This error is displayed when a severe problem with your WordPress site occurs, preventing it from loading for both front-end and back-end (dashboard) users. Basically, it’s WordPress’s way of preventing damage from a bad script or incompatible code.
In versions of WordPress prior to 5.2, encountering a critical PHP error would result in the White Screen of Death. However, WordPress 5.2 introduced a useful feature that enhances protection against fatal errors.
Now, instead of a blank screen, an error message is shown: “The site is experiencing technical difficulties.”

If you attempt to log in to your website dashboard (via yourdomain.com/wp-admin), you will encounter a somewhat altered notification. “The site is having technical issues. Please look in your site admin email inbox for further instructions.”

Sometimes it is also displayed as “There has been a critical error on this website.”

What Causes Critical Error in WordPress?
The source of this error message is the fatal PHP errors caused either by bad code, exhaustion of allocated PHP memory limit, or issues related to the web server configuration.
How to Fix “This Site Is Experiencing Technical Difficulties” In WordPress
Solution is very similar to the steps provided in White Screen of Death error. We need to track down the fatal error that is causing the WordPress to stop loading your WordPress site properly.
Method 1: Using Recovery Mode
Your sentence is mostly correct grammatically, but it can be improved for clarity and conciseness:
WordPress sends an email to the admin email of your WordPress website, with the subject line “Your Site is Experiencing a Technical Issue”, providing helpful information about the cause of the error.
In that email, there is a link that will take you to your WordPress dashboard with the Recovery Mode enabled.
After logging in, you’ll see a notification informing you that your site is in recovery mode together with a a link to the page where you can resolve the issue (which is mostly the installed plugins list).
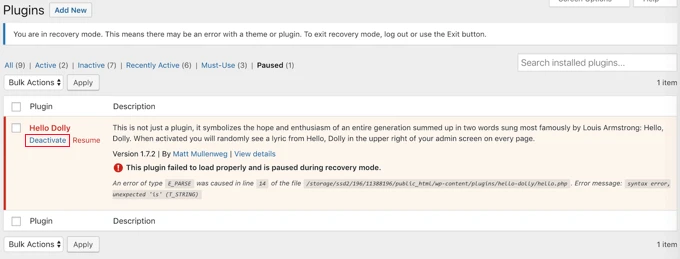
Once you disable the conflicting plugin or theme, you can click the Exit Recovery Mode button on the topbar. This should fix most of the problems. But, if you are still having issues, continue with the Method2.
Method 2: Fixing Manually
The manual method is almost the same as what we did when fixing the White Screen of Death error.
Enable WP_DEBUG (refer to WSoD WordPress Error solution above).
Refresh your homepage and find the error line with the fatal PHP error.
Disable the conflicting plugin or switch to a default WordPress theme.
If the error is about exhaustion of allocated PHP memory limit, increase it and try again.
Upgrade the PHP version if necessary. Sometimes, an outdated version of PHP can trigger issues.
Contact your hosting provider’s support team or seek for help from a professional.
Key Takeaways
For mainly security reasons, WordPress, by default, doesn’t reveal the actual error to the public. Instead, informs the website admin via email (with a link to access the dashboard in Recovery Mode).
Using the built-in Recovery Mode, or manual methods you can fix most PHP related WordPress errors yourself.
Check out this quick fix if you encounter an Elementor Server Error 500 when saving or updating a WordPress page built with Elementor.
Maximum Execution Time Exceeded
Have you ever encountered the internal server error message “Fatal error: Maximum execution time of ** seconds exceeded” when trying to access a page with many posts, or update a page with lots of content?
Depending on the server load, this error may occur if the web server can’t execute the PHP script within the usual 30-60 second time limit.
Why Does the Maximum Execution Time Exceeded Error Happen?
This issue arises when a PHP script in WordPress takes too long to execute, hitting the maximum time limit imposed by your hosting provider. This limit is crucial for safeguarding server resources and preventing potential misuse.
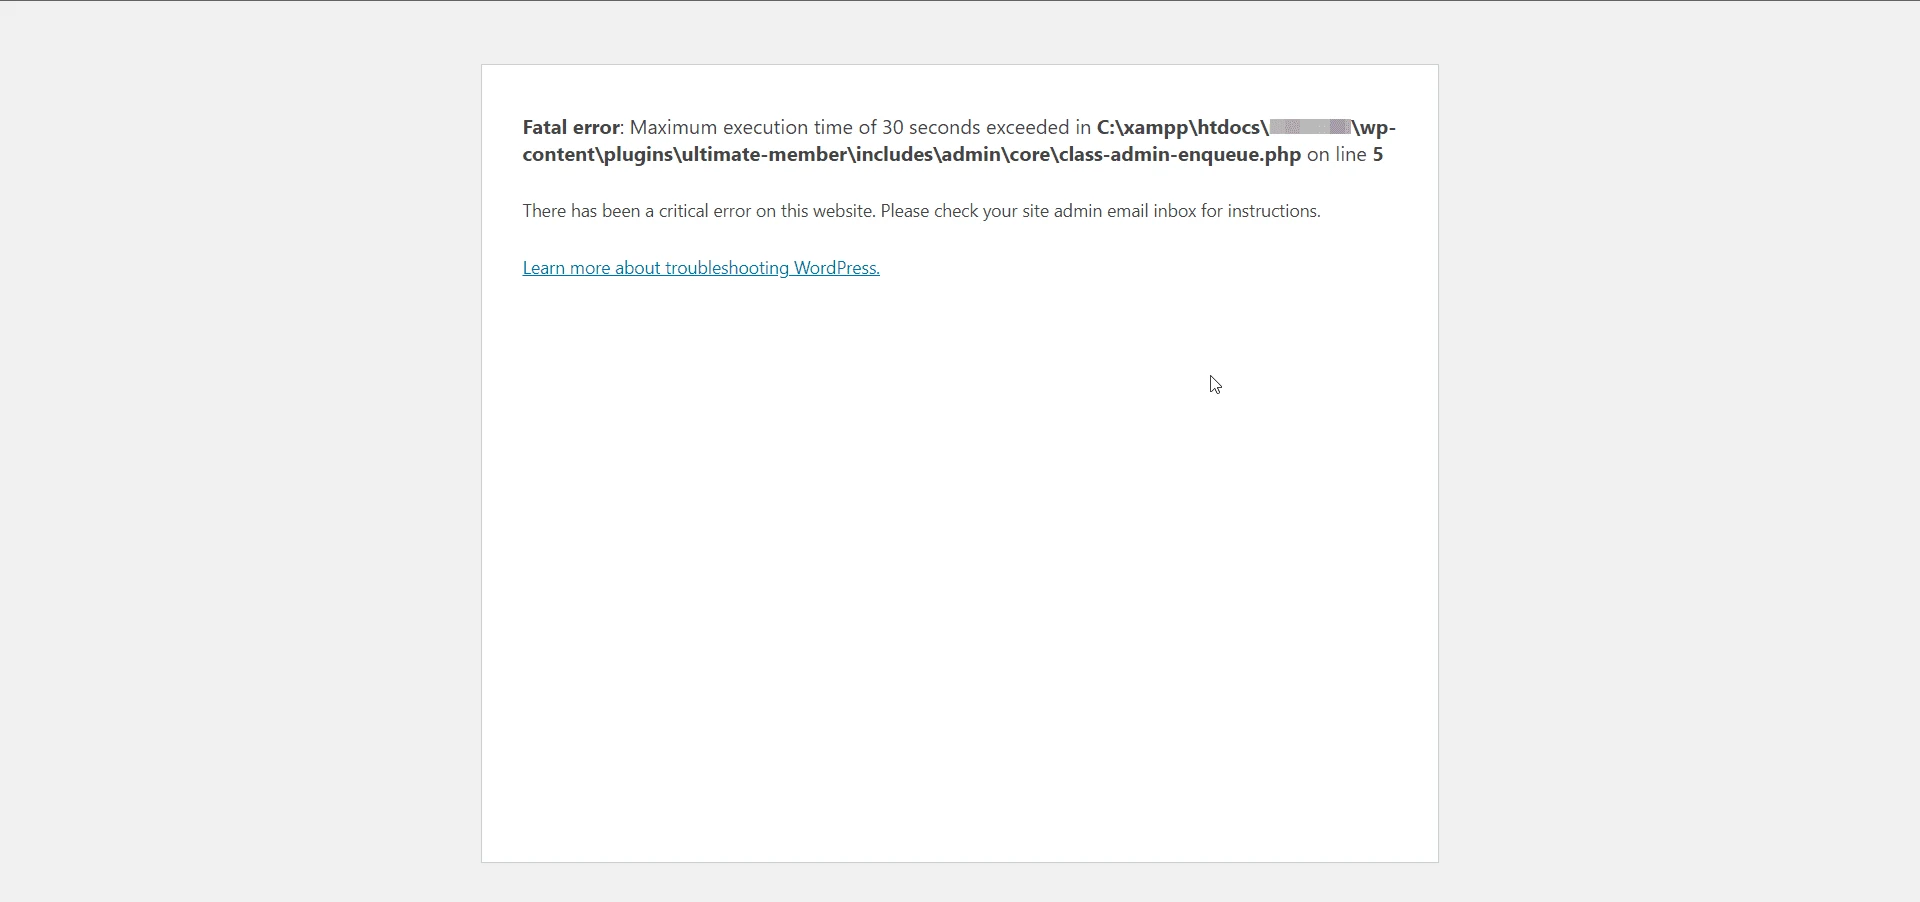
How to Fix Fatal Error: Maximum Execution Time Exceeded in WordPress
People often encounter this error when installing a new plugin or theme, or during updating them.
Updating plugins or themes in bulk can also lead to this error. I highly recommend doing updates one by one.
So, you can try this technique if you encountered the error while doing bulk updates. If not, continue with the methods below.
Method 1: Increase PHP Execution Time Using wp-config.php
This is my recommended fix for this error. Using cPanel’s File Manager or FTP, find the wp-config.php in your Wordpress root directory and edit it.
Scroll to the end of the file, and just above the line /* That’s all, stop editing! Happy blogging. */, insert the following code:
set_time_limit(300);A time limit of 300 seconds should be sufficient for most situations, but you can increase it if a specific plugin (usually those that import or export data) requires more time to execute properly.
Method 2: Increase PHP Execution Time Using a Plugin
This method can also be used by less experienced users. The WP Tools plugin by Bill Minozzi does a great job.

After installing the plugin, find the setting Add Max Execution Time Limit in WP Tools > Settings > General Settings and set to 120sec.
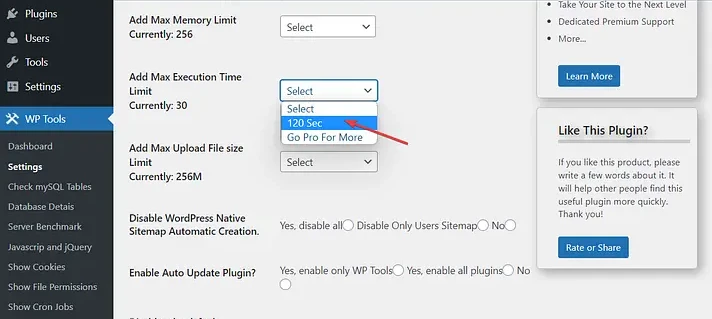
If 120 seconds doesn’t solve the issue on your WordPress website, then try the other methods, as this plugin allows only 120 seconds in the free version.
Method 3: Increase PHP Execution Time Using php.ini
Using cPanel’s File Manager or FTP, navigate to the public_html folder. Check for a php.ini file. If it exists, edit it; if not, create the file and add the code below, save and exit.
max_execution_time = 300Depending on your hosting provider, you might need to use user.ini file instead of php.ini. So if php.ini doesn’t change the maximum execution time, try using user.ini or contact your hosting provider.
Method 4: Increase PHP Execution Time Using .htaccess File
I personally don’t prefer doing this via .htaccess file because some web servers cause HTTP 500 internal server error when they don’t allow PHP variable changes through .htaccess.
Using cPanel or FTP, edit the .htaccess file in public_html folder and add the following code at the end of the file.
php_value max_execution_time 300Save the changes and exit file.
Key Takeaways
The PHP max execution time is a protection mechanism used by web servers to prevent the misuse of server resources.
Try to use plugins that don’t run for long periods to avoid exceeding the time limit, and only increase it if you heavily rely on a specific plugin or can’t identify the cause of the long execution.
Error Establishing Database Connection
WordPress relies on a MySQL or MariaDB database to store and manage dynamic content, including posts, pages, plugin settings, comments, and other user-generated content.
If something goes wrong during this database connection, you’ll likely see this error message:
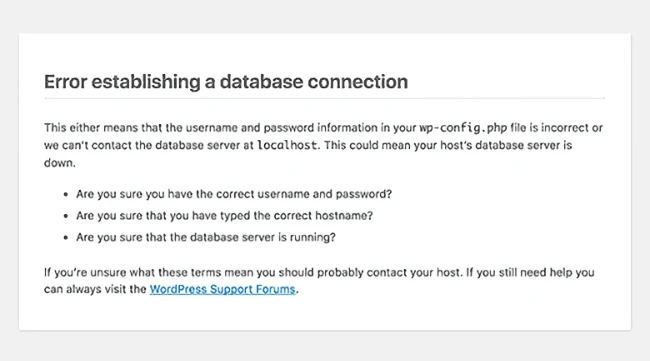
What Causes Error Establishing a Database Connection Issue?
Incorrect database credentials: Mismatched database name, username, password, or host (MySQL server which is usually localhost) in the wp-config.php file.
Insufficient user privileges: Even if you have the correct username and password, the user may not have the necessary privileges.
Database server issues: The database server may be down or overloaded.
Corrupted database: Tables in the database may be corrupted and need repair.
Exceeding database limits: Hosting provider limitations may cause issues if the database exceeds resource limits, such as frequent read-write operations.
File corruption: Corruption in WordPress core files due to incomplete updates, injected malware, or incorrect file permissions may prevent WordPress from establishing a proper database connection.
How to Fix the Error Establishing a Database Connection
As you now understand the most possible causes of this error message, I can guide you how to fix them.
Fixing Database Credentials and User Privileges
WordPress stores the database host, database name, username, and password data in the wp-config.php file found in public_html (WP root) folder. Open this file via File Manager in cPanel or FTP client and look for the following database parameters.
/** The name of the database for WordPress */
define( 'DB_NAME', 'database_name_here' );
/** MySQL database username */
define( 'DB_USER', 'username_here' );
/** MySQL database password */
define( 'DB_PASSWORD', 'password_here' );
/** MySQL hostname */
define( 'DB_HOST', 'localhost' );
Log in to your control panel and locate the MySQL Databases section. Check if the database name in the wp-config.php file exists. Verify that the username is assigned to the database with all privileges. If not, grant all privileges and save. Finally, reset the username’s password to match the one in the wp-config.php file.
At this stage, check if your website is working.
How to Repair Database with Corrupted Tables
If you encounter the error message “One or more database tables are unavailable” or “The database may need repair” in your WordPress admin dashboard, one or more tables in the database could be corrupted. You should proceed to repair your database.
Before moving further, make sure to backup the WordPress database either via Updraft Plus plugin or using the export feature in PhpMyAdmin.
To initiate the database repair, insert the following code at the bottom of your wp-config.php file:
define('WP_ALLOW_REPAIR', true);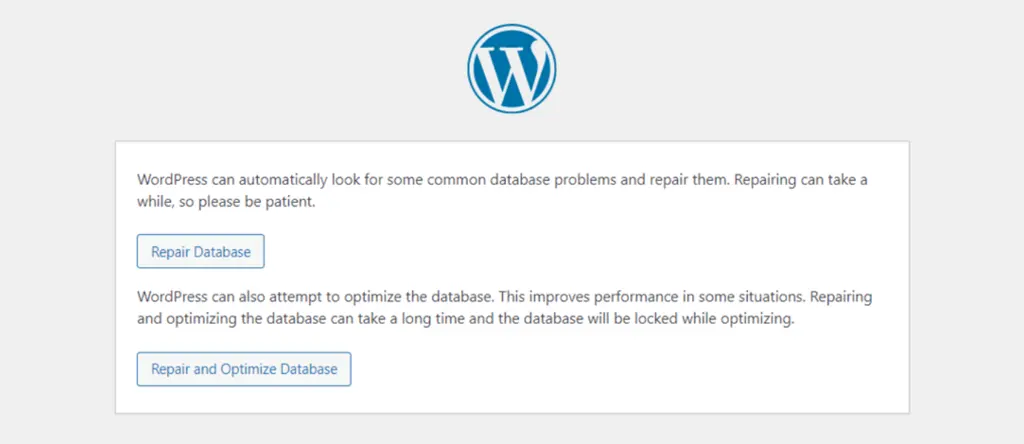
Open a new tab in your browser and navigate to http://www.your-site-domain.com/wp-admin/maint/repair.php. Choose the Repair Database option from the two available options and wait for the process to complete.
Check your WordPress site once again, and if it works, promptly remove the repair initiating code from the wp-config.php file.
Lowering Database Queries and Concurrent Connections
If you occasionally continue to see the database error, it could be due to the maximum number of connected clients limitation set by your hosting provider, to avoid misuse of web server resources.
Web sites with heavy traffic, or sometimes due to a badly coded plugin that fails to close database connections properly can lead to this issue.
You should consider using page cache plugins such as WP Fastest Cache, or WP Rocket to cache your pages and avoid querying the database for each page load.
Check Your Domain’s Name Servers
If you recently migrated your WordPress website to a new host, your domain name’s name servers (DNS) might not yet propagated. In that case, check if your domain is pointing to the correct name servers via DNS Checker tool.
Key Takeaways
Even though Error Establishing a Database Connection can be caused by many factors, mostly it happens due to incorrect database credentials, and user privileges.
If these are correct, you may consider contacting your hosting provider and ask whether your WordPress installation is using the correct database settings or exceeding their limits.
Lowering resource usage of heavy-traffic websites can be challenging for beginners. I recommend that you regularly optimize your database tables using WP Optimize, or seek help from a WordPress expert.
Syntax Error / Parse Error
Syntax errors are mistakes in PHP code found within theme files, plugin files, or primarily functions.php, which are typically added to customize a theme’s appearance or introduce custom functionalities.
What Causes Syntax Error in PHP Code?
These errors occur when adding code snippets to WordPress and inadvertently omitting something (such as failing to close a parenthesis or forgetting to end a line with a semicolon) or using incorrect syntax, which leads to a PHP parse error.
A sample syntax error would look like this, pointing out the exact line that’s causing the error.
Parse error- syntax error, unexpected $end in /public_html/domain_name/wp-content/themes/your-theme/functions.php on line 154When adding a code, even a minor mistake, can make your entire site inaccessible. This often happens when inexperienced users paste code incorrectly without understanding PHP’s syntax requirements, but there’s no need to panic.
How to Fix Syntax Error in WordPress
If you pasted code within the WordPress dashboard, using Appearance > Editor section, you will most likely be locked out, as both frontend and backend of your website will be inaccessible.
This causes new users to panic, because normally they access their WordPress website only through the Dashboard.
The only way to fix this is to edit the file you last changed via FTP or File Manager feature of your hosting control panel (cPanel). If you don’t have FTP or cPanel access, simply contact your hosting provider’s support.
Once you get access, simply browse to the folder (path) that is displayed exactly in the error message.
For example; in the above sample error, you need to double-click each folder in your FTP client or File Manager starting from public_html, wp-content, themes, your-theme, and then finally download or edit functions.php
Most text editors will display lines. Scroll to the line that the error message points to. Remove the recently added code or correct its syntax. Save and if you downloaded it via FTP, upload back to server.
Next, refresh your WordPress site. You should find that WordPress error is gone, and your site is functioning normally again.
How to Prevent the Syntax Error
There are two amazing plugins that will help you add code snippets safely to your WordPress site.
One of them is WP Code, and the other is Code Snippets. They not only check the PHP syntax of your code during editing but also prevent you from saving code that could potentially break your website.
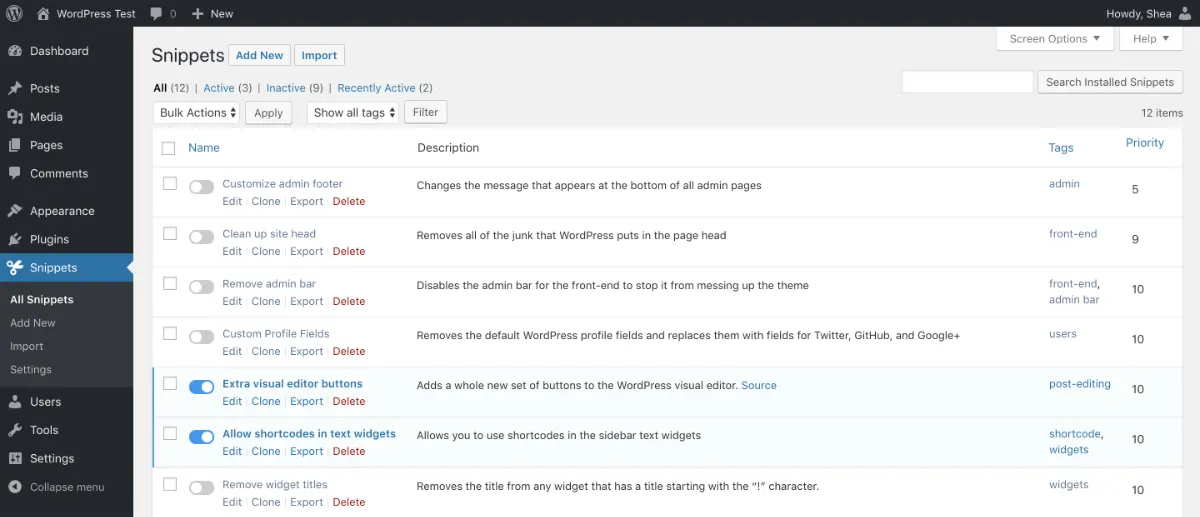
Another benefit of these plugins is, normally you need to have a child wordpress theme in order to properly edit functions.php.
If you directly edit the functions.php of your theme, all changes will got lost when your WordPress theme is updated.
Both WPCode and Code Snippets plugins allow you to add code to your WordPress site without needing a child theme. I, personally use Code Snippets on almost all the sites I work on and find it very helpful.
Key Takeaways
Results from incorrect PHP syntax in theme or plugin files.
Locate and correct syntax errors using FTP or File Manager.
WordPress Posts Returning 404 Error
Another common WordPress issue is the 404 Not Found error when WordPress users try to access individual pages or posts on a WordPress site.
What Is a Permalink in WordPress?
In WordPress, a permalink is the URL for a blog post, page, category, or tag on your site.
These permanent links stay the same even if you change your site or post titles. They are important for SEO, as search engines prefer descriptive URLs with relevant keywords, and they make it easier for users to navigate your site.
What Causes 404 Page Not Found Error?
The .htaccess file helps WordPress manage the permalinks (URL structures). If this file is corrupted or missing, it can cause 404 error when trying to access your posts.
How to Fix 404 Page Not Found Error in WordPress?
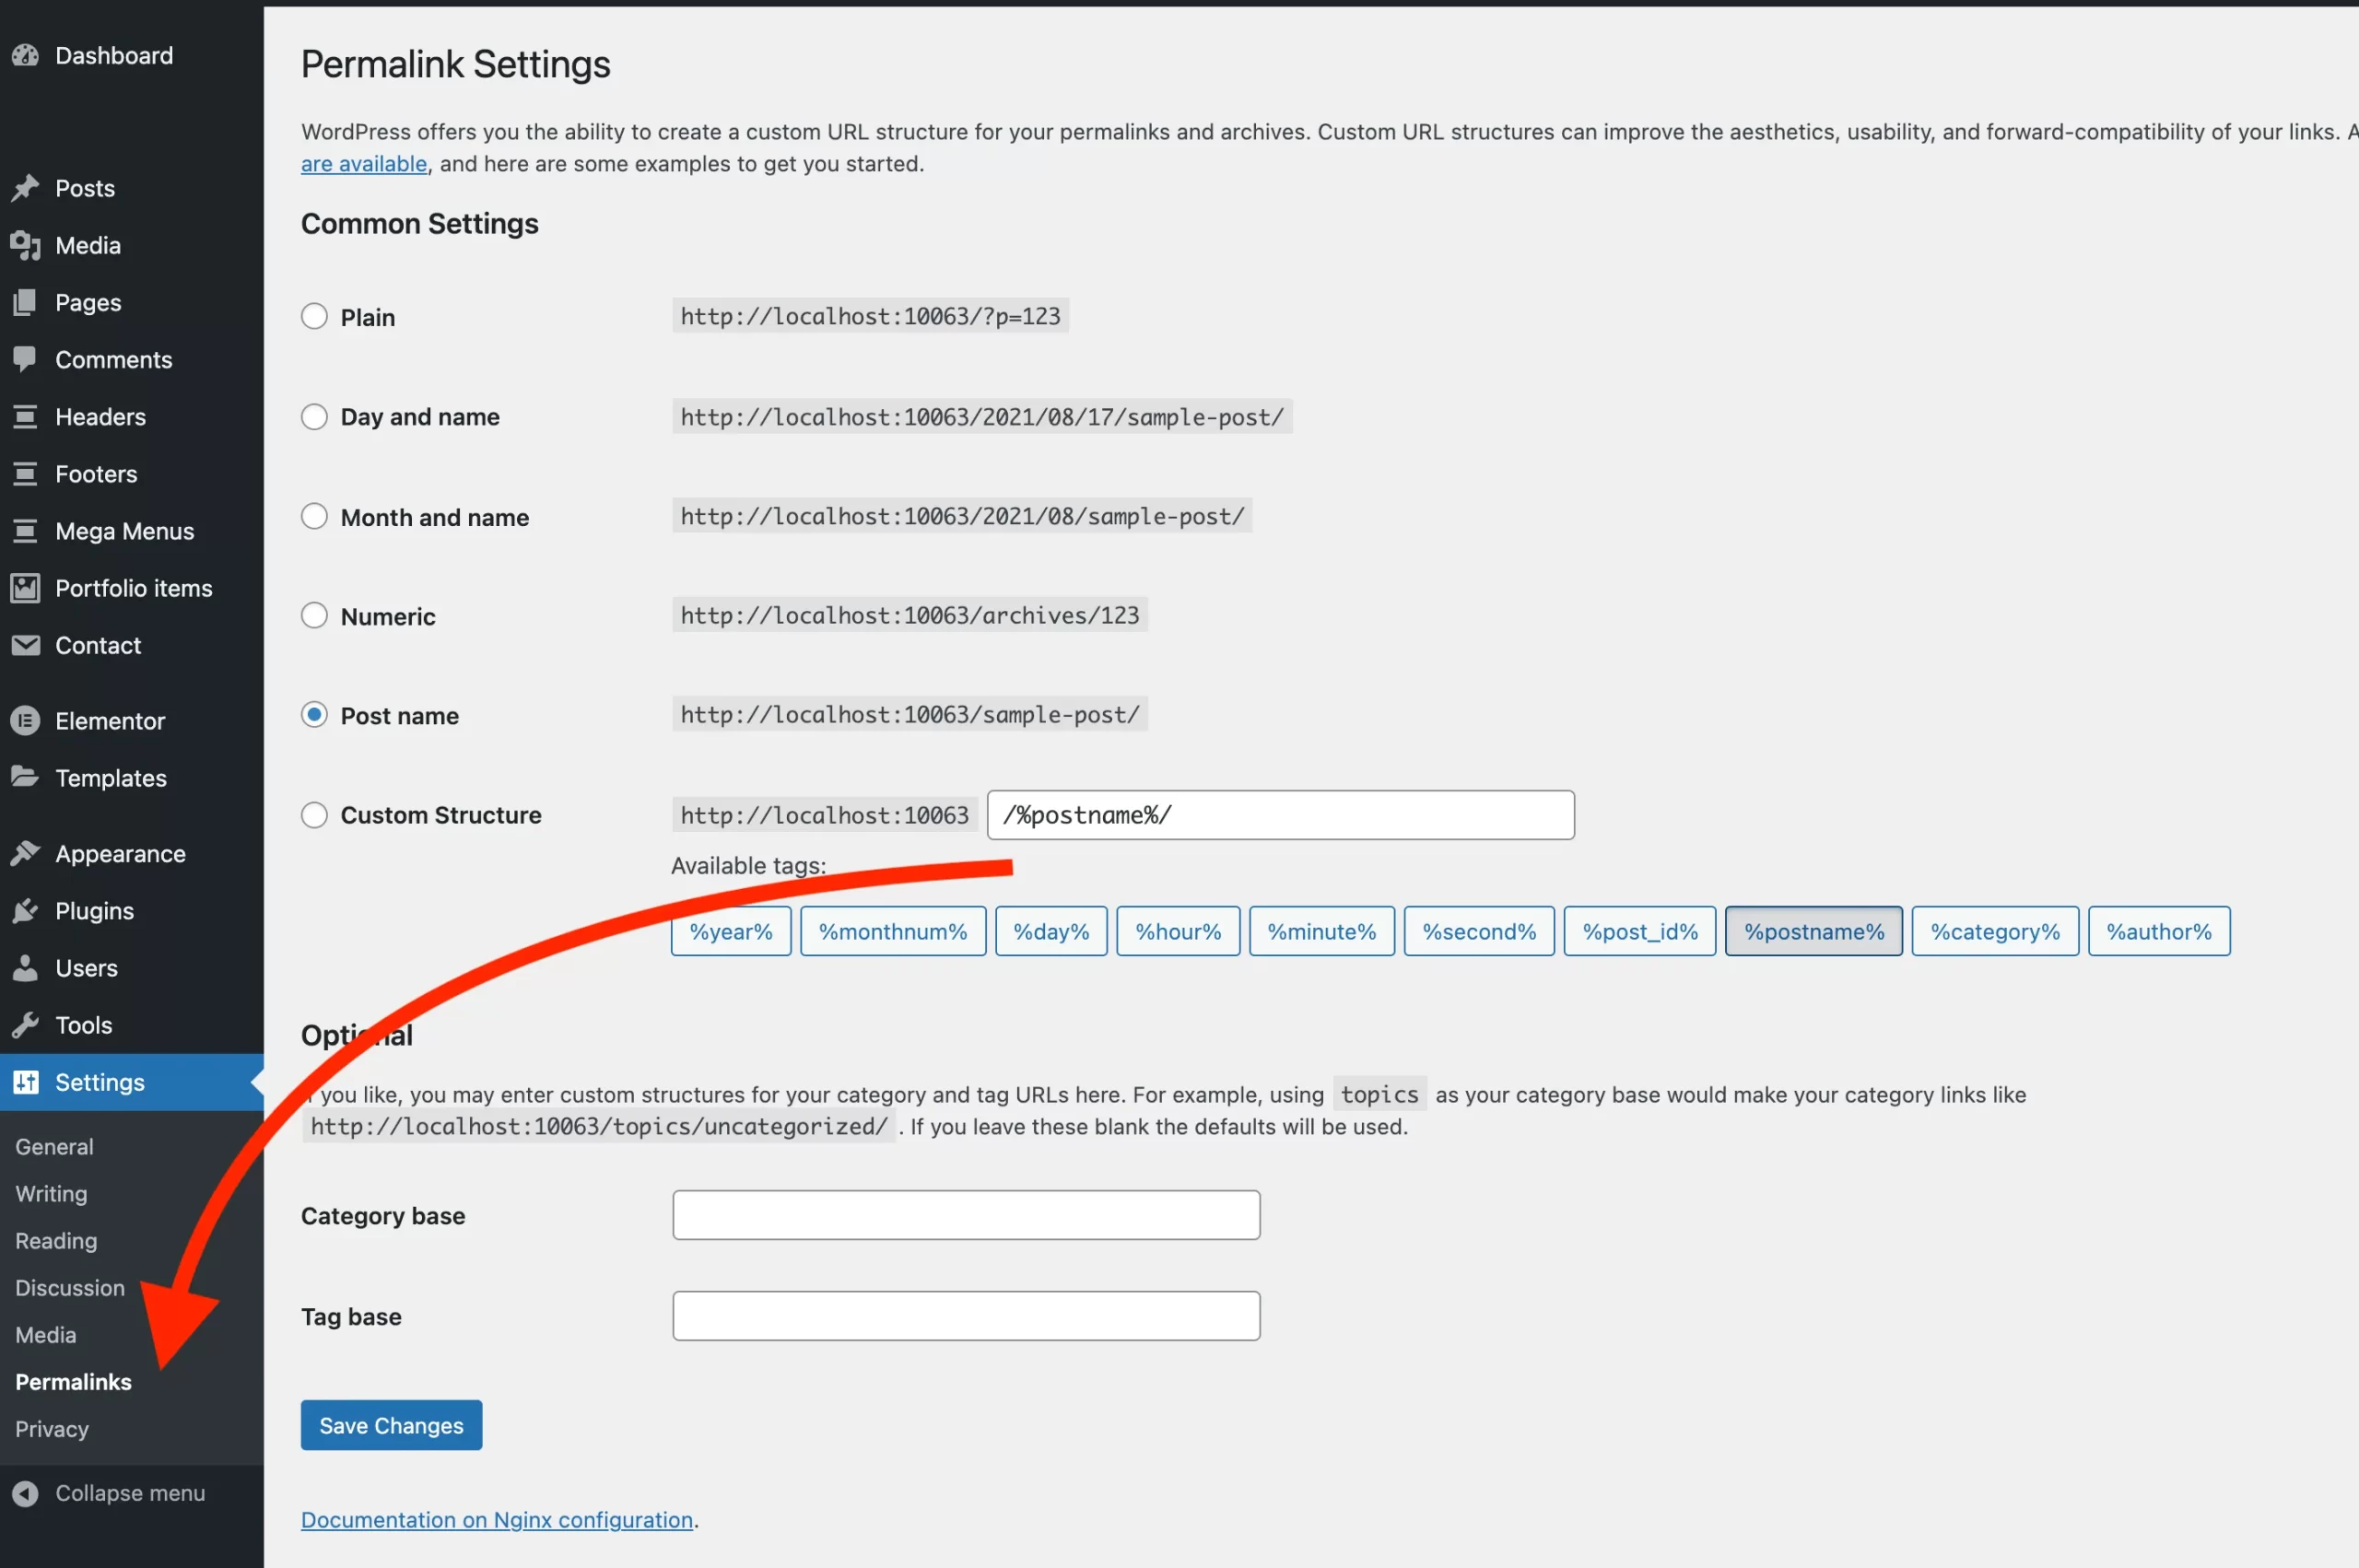
You can easily solve the issue by just saving your permalink settings. This action restores the .htaccess file and should fix most issues.
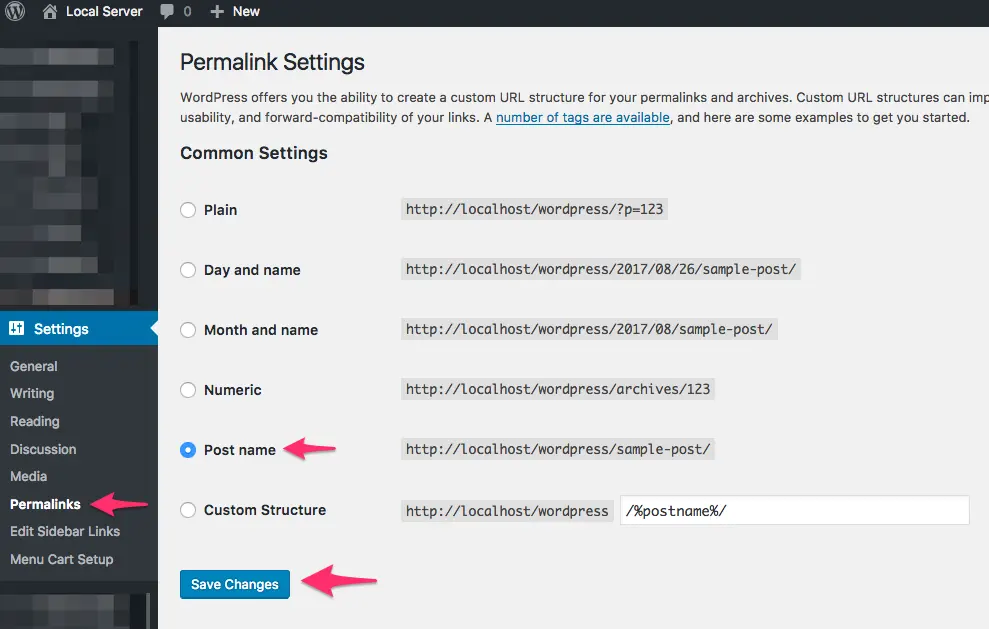
If that doesn’t solve the issue, you can try to check and edit the .htaccess file manually.
Using your control panel or FTP, browse to public_html folder and check if there is a .htaccess file present. File names starting with a dot are by default hidden files. So, make sure your file manager is set to display hidden files and folders.
If there is no .htaccess file, create a new file and rename it to .htaccess then add the code below, save and exit.
# BEGIN WordPress
<IfModule mod_rewrite.c>
RewriteEngine On
RewriteBase /
RewriteRule ^index.php$ - [L]
RewriteCond %{REQUEST_FILENAME} !-f
RewriteCond %{REQUEST_FILENAME} !-d
RewriteRule . /index.php [L]
</IfModule>
# END WordPress
Important: Please note that .htaccess is used by Apache web servers. If your web server is running Nginx, please contact your hosting provider for support.
Key Takeaways
Caused by corrupted .htaccess or permalink settings.
Reset permalinks to fix using WordPress dashboard.
Image Upload Issue
Image upload issue, or broken images in media library issue, is one the most common WordPress errors that puzzles WordPress website users.
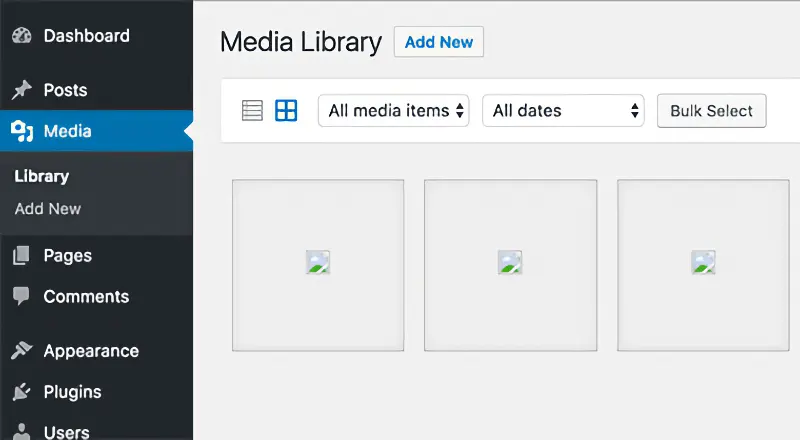
You may suddenly find that all images on you site have disappeared, replaced by broken placeholders. Additionally, you may notice an error message when you try to upload an image to a post, or directly into Media library.
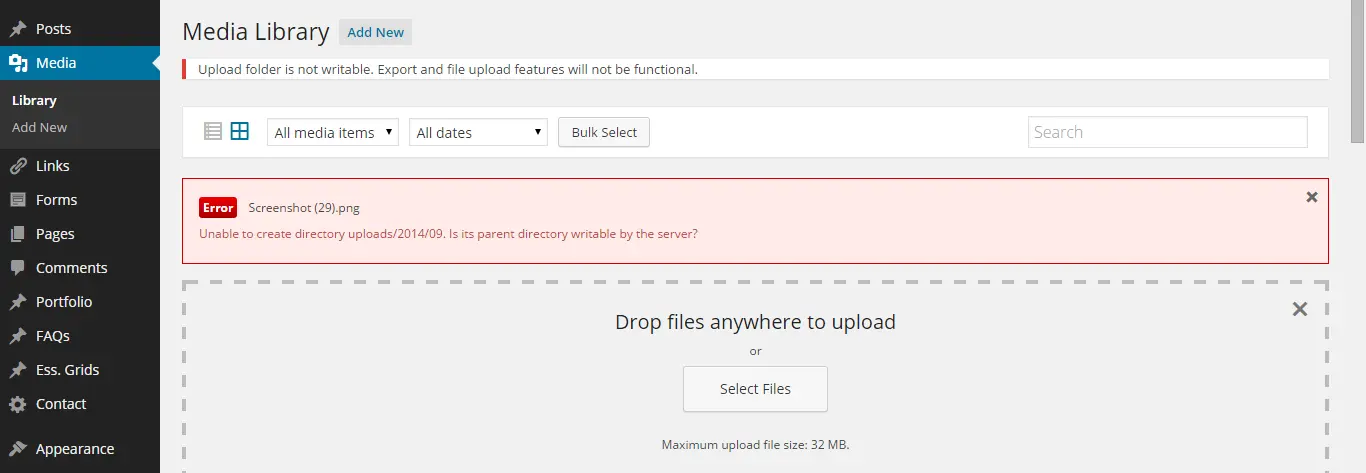
What Causes the Image Upload Issue in WordPress?
Most likely, this issue is caused by incorrect file permissions.
I have also seen occasions where malicious code (malware) injects a .htaccess file to all folders in WordPress including uploads folder in /wp-content/ and blocks all files using DENY command.
How to Fix the Image Upload Issue in WordPress
In order to fix file permissions, you need FTP access. You can use Filezilla FTP client for this purpose.
Once you login, find the uploads folder, which is located in the wp-content folder.
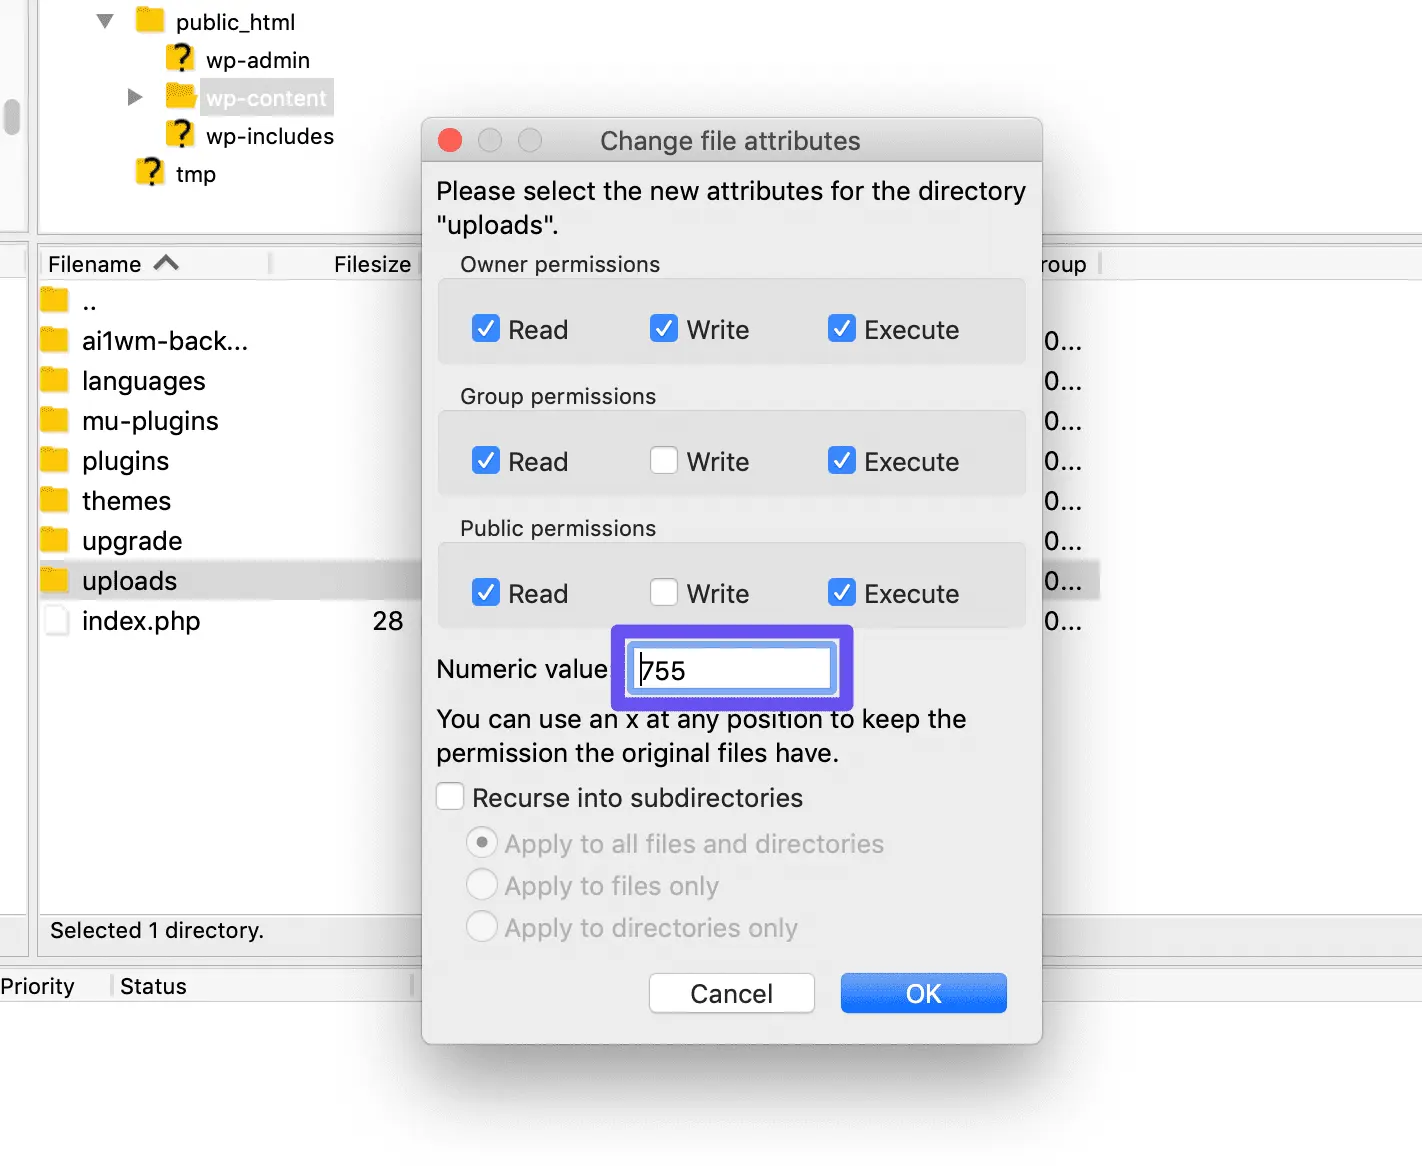
Type 755 to numeric value field and click OK to apply. This will fix the folder permission errors.
We also need to fix the file permissions in each subfolder. It would be very tedious to do this one by one for each file. So, this time we will use the recurse option.
Right-click on uploads and choose File permissions once more. Set the value to 644 and ensure you select the Recurse into subdirectories option and also choose Apply to files only. This will fix the file permissions.
If you can see the images in Media Library, but still can not upload images, then your hosting disk quota or inodes limit might be the issue. Check your current usage at your hosting provider.
Key Takeaways
Often due to incorrect file permissions or malware.
Set correct permissions (755 for folders, 644 for files) using FTP.
Briefly Unavailable for Scheduled Maintenance Error
WordPress version 3.0 introduced a feature called automatic maintenance mode, which temporarily disables your website during plugin or theme updates to prevent users from interacting with your site.
These updates complete in a matter of seconds. So, it’s very hard to notice the maintenance mode message displayed.
If you are very curious to test this feature, open two tabs in your browser. Initiate a plugin update in one tab and refresh your homepage immediately in the other tab.
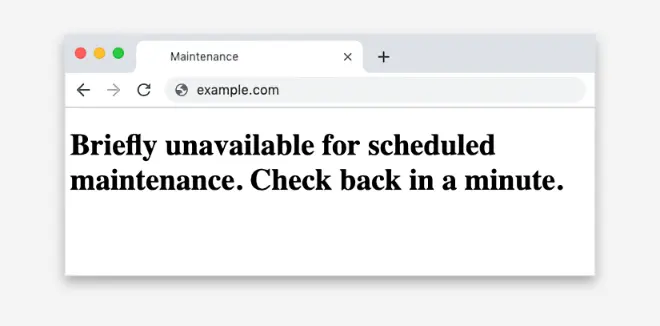
What Causes Your Wordpress Site to Stuck in Maintenance Mode
If an update is interrupted before completion, your site may remain in maintenance mode indefinitely.
This issue usually arises if you try to update multiple plugins at once. Thus, I highly recommend you do the updates one by one.
How to Fix Briefly Unavailable for Scheduled Maintenance Error
Fixing this error is much easier than you think. You only need control panel or FTP access.
Locate and delete the .maintenance file in root folder of your WordPress installation (public_html in most cases).
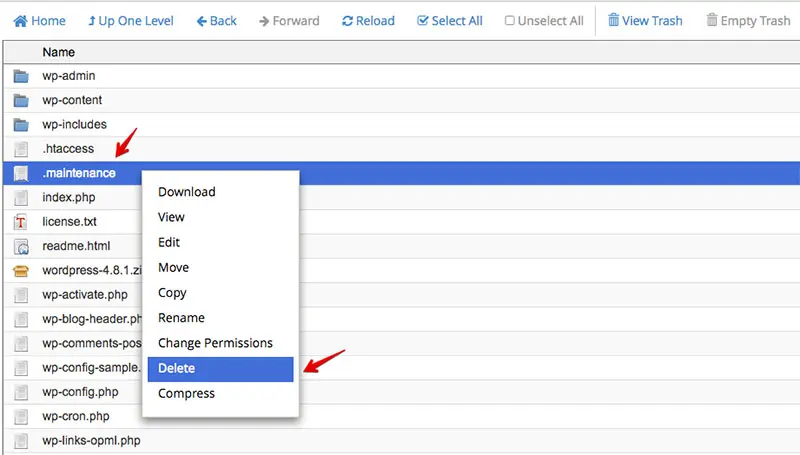
Presence of .maintenance activates the built-in WordPress maintenance mode. Removing it should make your site accessible again.
Key Takeaways
Occurs during interrupted updates, leaving site in maintenance mode.
Delete .maintenance file in WordPress root directory to restore site.
Error Too Many Redirects
One of the most common WordPress errors that can lock you out of your website is this one.
It can be frustrating because no matter how many times you refresh, your browser will display the same error message after a brief wait.
Different browsers may display a different error message for this issue. For example, Google Chrome displays it as follows, while Firefox displays “The page isn’t redirecting properly”.
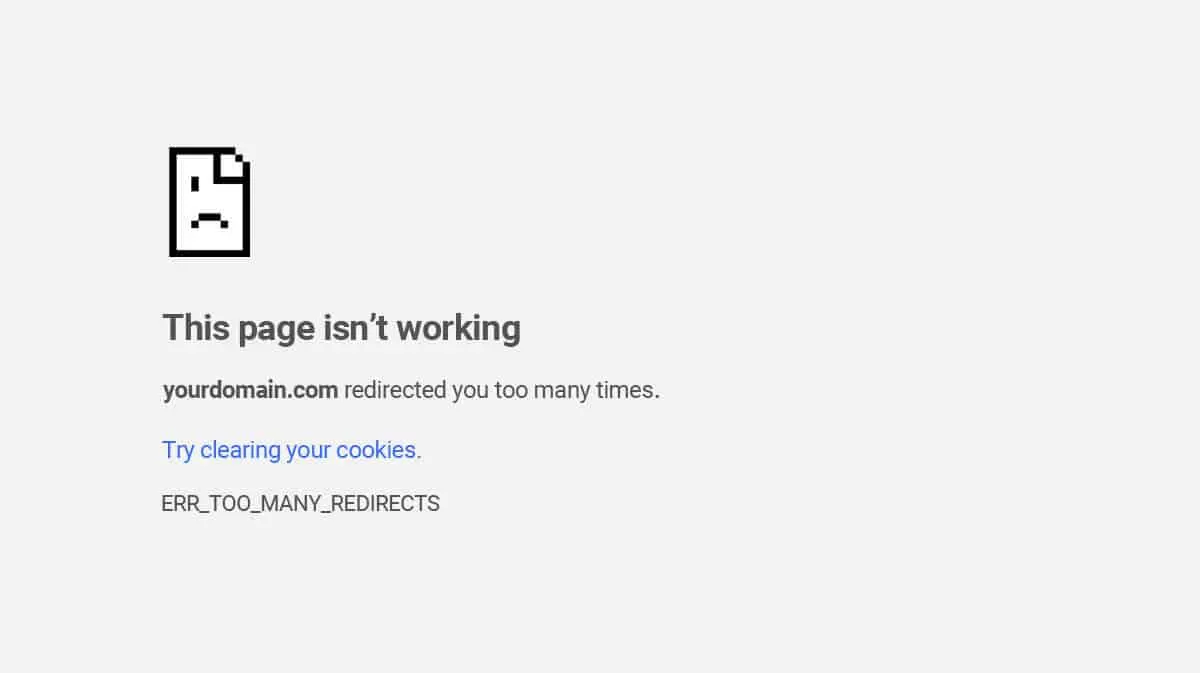
What Causes Too Many Redirects Error in WordPress?
This issue happens when there is a misconfiguration in your WordPress installation that redirects the user back and forth between two URLs.
Usually, misconfigured SEO or SSL plugins cause this issue.
For example, SEO plugins have an option to 301 permanent redirect certain pages to other pages to avoid 404 not found errors. Similarly SSL plugins try to redirect URLs starting with http to https to avoid “mixed content”, or “insecure content” issues.
How to Fix Error Too Many Redirects Issue?
There could be various sources to this problem. So, try each solution one by one.
Method 1: Clear Cookies
Try accessing your website with a different browser. If successful, clear the cookies and cache in your usual browser.
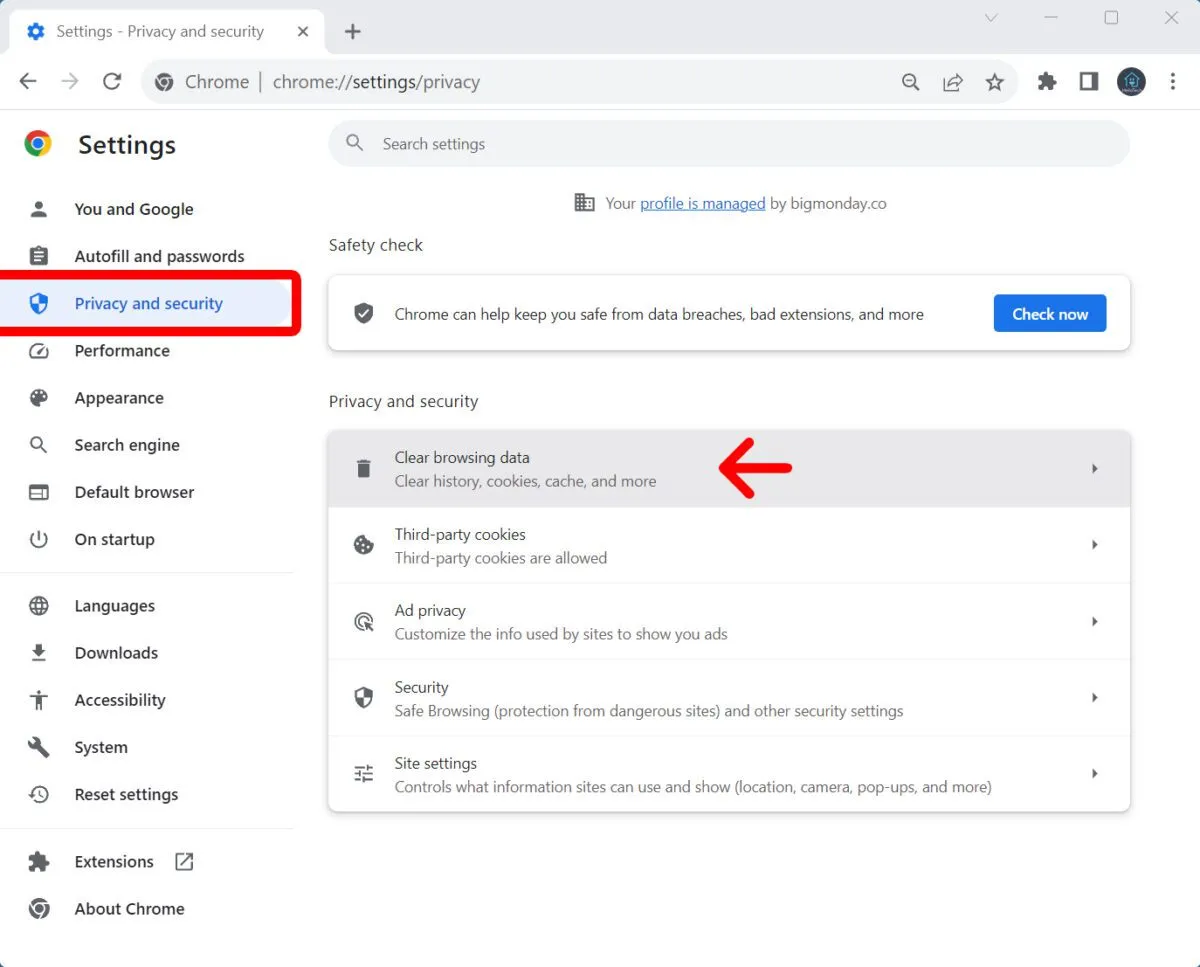
Method 2: Save Permalinks to Reset .htaccess File
.htaccess file is being used for all URL configurations in WordPress. You can easily reset .htaccess by saving Permalinks in Settings section of your dashboard.
This will remove any corruptions and possibly fix the issue. If not, continue with method 3.
Method 3: Deactivate Plugins
As I stated above, SEO or SSL plugins are the main reason behind this error. If you are using an SEO optimization plugin such as Yoast SEO, or SSL plugin such as Really Simple SSL, try deactivating them and test your site.
If that doesn’t solve, try to deactivate all your plugins and make sure there are no code snippets added to functions.php of your child theme that may cause redirection loops.
Key Takeaways
Results from misconfigured plugins or SSL settings.
Clear browser cookies or reset .htaccess via permalink settings.
WordPress Not Sending Email (SMTP Issue)
Even though your contact forms are properly configured, emails may not be delivered to the recipient’s inbox and could instead end up in the spam folder.
The PHP mail() function is used to send emails from a PHP script. It accepts parameters such as recipient address, subject, and message body.
WordPress core, themes and plugins are written in PHP and by default, they make use of PHP’s mail() function to send out emails through your web server.
Why WordPress Fails to Send Emails?
It’s difficult for beginner WordPress users to track what’s going on behind the scenes when an email is being sent through PHP’s mail function.
WordPress doesn’t display any error when PHP mail() fails to deliver an email or when that email ends up in the recipient’s spam folder.
The most common causes of this issue are misconfigurations with your hosting provider or incorrect DNS settings when your emails are hosted on Gmail, Office 365, or a similar email provider while your website is hosted with a different hosting provider.
The latter often causes your emails to be detected as spam because when you use email services on a third party provider your emails are expected to source from that provider.
What is SMTP?
SMTP stands for Simple Mail Transfer Protocol. It’s a communication protocol used to transfer electronic mail (email) messages between servers.
SMTP configuration in WordPress allows you to specify an SMTP server, port, and authentication details (like username and password) to send emails. This way, you can control how emails are sent from your website, improving deliverability and reliability compared to relying solely on the default PHP mail() function, which can be less reliable in certain hosting environments.
How to Fix WordPress Not Sending Email Issue?
I strongly recommend you to use an SMTP plugin, if you are using any type of contact form, mailing list, WooCommerce, or any other functionality that tries to send email through your website.
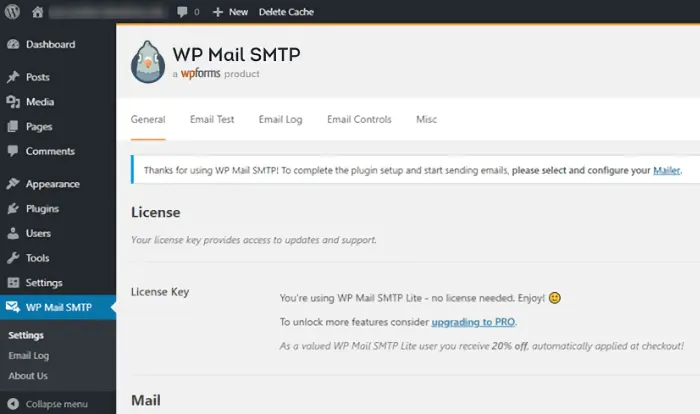
There are fantastic plugins that does this job. My recommendation is to use WP Mail SMTP for this purpose.
I have used WP Mail SMTP on multiple sites and never had an issue with it. With its free version you can connect your site with a standard SMTP server. Other than standard SMTP, this plugin supports many other services and APIs.
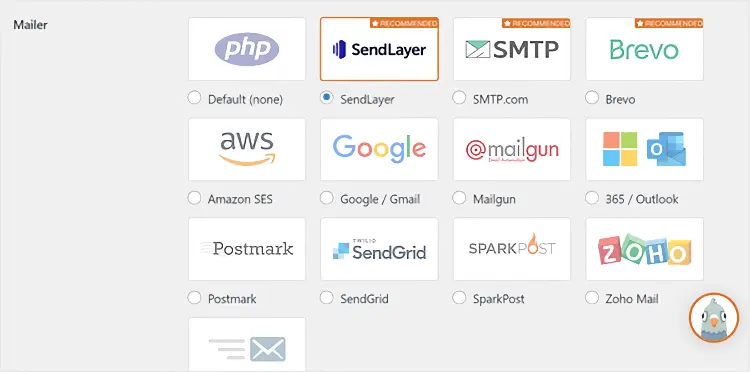
You can also send a test email directly from its settings page and test your WordPress site’s mail functionality.
I highly recommend you to add a DMARC record to your domain’s DNS zone for improving your email deliverability as well.
Key Takeaways
PHP mail() function may fail due to your web server configuration.
Configure SMTP settings using plugins like WP Mail SMTP for reliable email delivery.
Troubleshooting Like a Pro
I believe this comprehensive guide will help you learn how to diagnose and fix WordPress errors like a pro.
If you found this article helpful, please consider sharing it and subscribing to our mailing list. You’ll get notifications whenever I publish new posts on WordPress troubleshooting, along with expert tips and tricks.

