Supercharge Your WordPress Site with Cloudflare Cache Preloading
These days, optimizing performance requires more than a fast server, an optimized site, and static caching of pages and assets on your origin server.
It’s also about delivering content from a location as close as possible to your visitors. That’s where Cloudflare‘s global network of edge locations comes into play.
To truly take advantage of this network, it’s essential to preload Cloudflare cache, ensuring your pages are already stored across edge servers worldwide before users ever visit.
But how do you make sure your content is actually available on all those edges before real users hit your pages. That’s the purpose of preloading (warming up) the Cloudflare cache on as many edge locations as possible.
In this article, we will dive into how you can do that effectively with our in-house developed WordPress plugin, Super Preloader for Cloudflare.
We will cover everything from how Cloudflare edge works, why you need a Cloudflare Worker, how to create and deploy a Cloudflare Worker, and why to use Webshare proxies.
If you are not familiar with Cloudflare and would like to find out how to set up Cloudflare for your WordPress site, I strongly suggest you go through that first.
What is Cloudflare Edge?
Cloudflare is a global CDN (Content Delivery Network) with over 300+ edge locations spread around the world.
These edge servers act as cache layers between your website and your visitors. When someone accesses your site, Cloudflare tries to serve static content (like HTML, CSS, JS, images) from the nearest edge location.
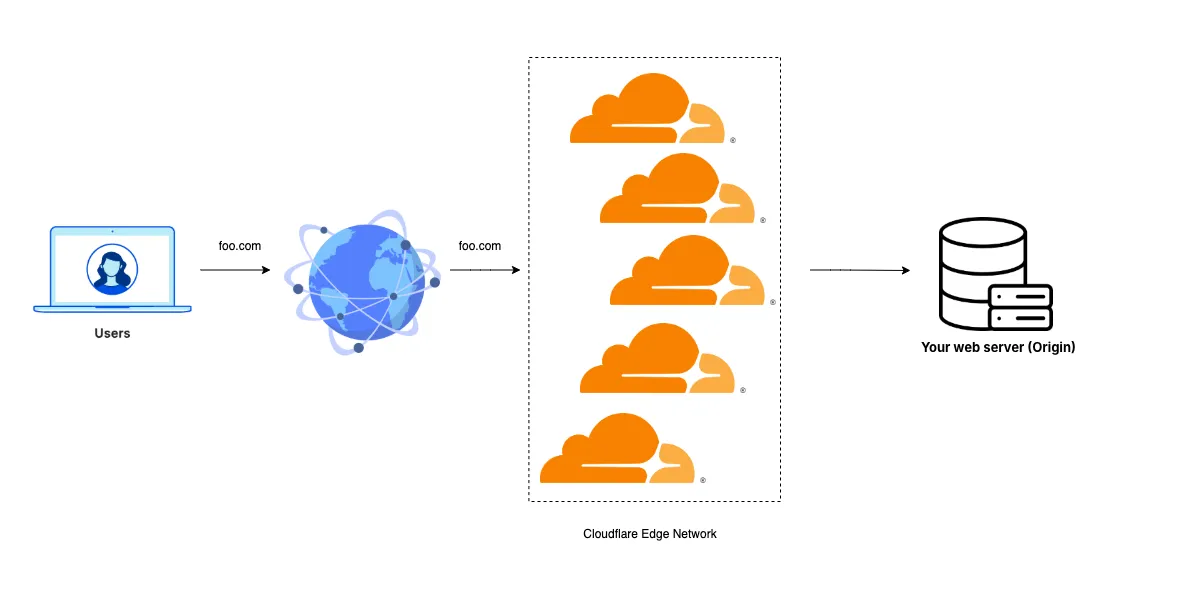
Cloudflare only caches content on demand, meaning a user from Frankfurt must access a page before that Frankfurt edge location has the page cached.
Until then, the request is routed back to your origin server, which typically results in a slower fetch, and increases time to first byte (TTFB).
Preloading solves this by priming those caches ahead of time, ideally for each URL in your website’s sitemap.xml.
Unfortunately, Cloudflare doesn’t offer any native tool or interface for preloading cache across all its edge locations and it has been discussed over Cloudflare Community forums.
Why You Should Set Up Super Page Cache First
Before you begin preloading Cloudflare’s cache with our Super Preloader plugin, it’s important to ensure that your website’s HTML pages are actually cacheable on Cloudflare in the first place.
Luckily there is a great WordPress plugin for that: Super Page Cache
This plugin configures Cloudflare to cache full HTML pages, not just static assets like images, CSS, or JavaScript. Without this step, Cloudflare will still contact your origin server for every page request, which defeats the purpose of edge caching.
By setting up Super Page Cache:
- Your WordPress website’s HTML responses are stored at Cloudflare edge locations.
- Your origin server load is dramatically reduced.
- You unlock the full benefit of using our Super Preloader to warm those caches globally.
In short, Super Page Cache makes your pages cacheable, and Super Preloader makes sure they are cached on as many different locations as possible.
So before moving on, make sure Super Page Cache is installed, properly configured, and confirmed to be working. Then you’re ready to let Super Preloader handle the global cache warm-up.
Why a Cloudflare Worker Is Needed to Preload Cache
Cloudflare Workers allow you to run serverless code directly at the edge. This makes them ideal for sending synthetic traffic to your site from each location.

Preloading a cache is more complex than just requesting pages from your server.
You need to do it:
- From multiple geographic regions
- With minimal server load
- Without triggering security protections (like rate limits)
A Worker acts as a lightweight middleman. It fetches your content using a signed request (via a shared secret) and makes sure each request mimics a real user.
Only Workers have direct access to Cloudflare’s edge cache API. For example, the following JavaScript code is only valid inside a Worker:
await cache.put(targetUrl, originResponse.clone());
This line stores a custom response into Cloudflare’s edge cache. No external server, whether it’s your origin or a regular proxy, has permission to write into that cache directly.
This makes Workers essential for precise control over what gets cached and how.
Additionally, the plugin captures the cf-ray response header from each request. This header contains a unique ID that includes the location of the edge server that served the response (e.g., cf-ray: 73d88aa13dfeFRA).
This allows our plugin to track which Cloudflare data center responded, providing insight into cache coverage and showing which URLs are cached at specific edge locations.
Without a Worker, your server IP is reused to access the Worker URL. Thus, Cloudflare will only cache content at the edge closest to your web server (origin).
How to Create and Deploy a Cloudflare Worker
Before proceeding with this step, ensure that your domain name’s DNS servers are pointing to Cloudflare and that your site is running on the Cloudflare network.
Navigate to your Cloudflare account home and click Workers & Pages under Compute.
Next, click Create application.
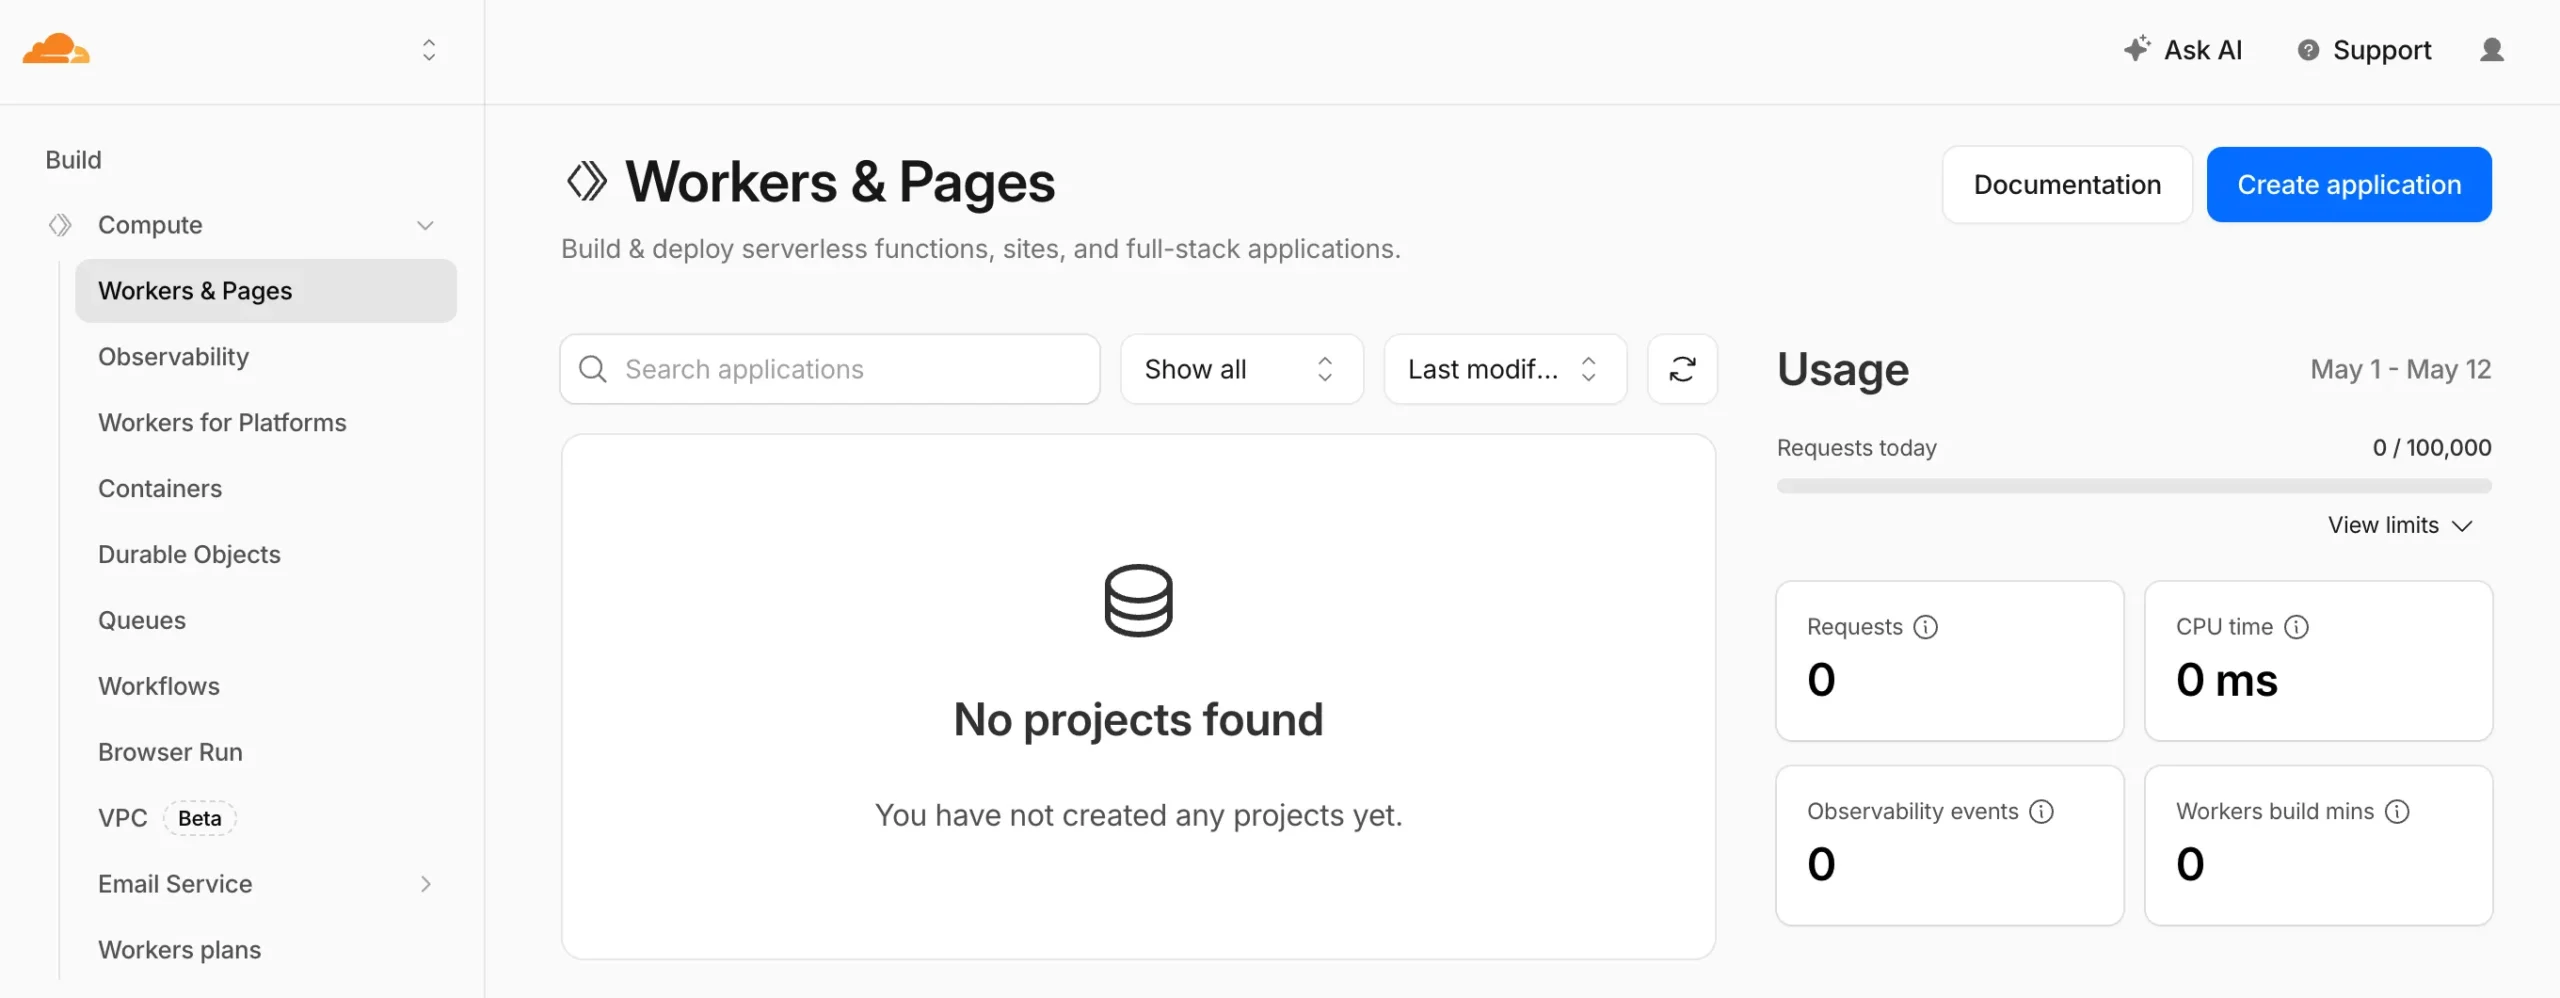
Choose Start with Hello World.
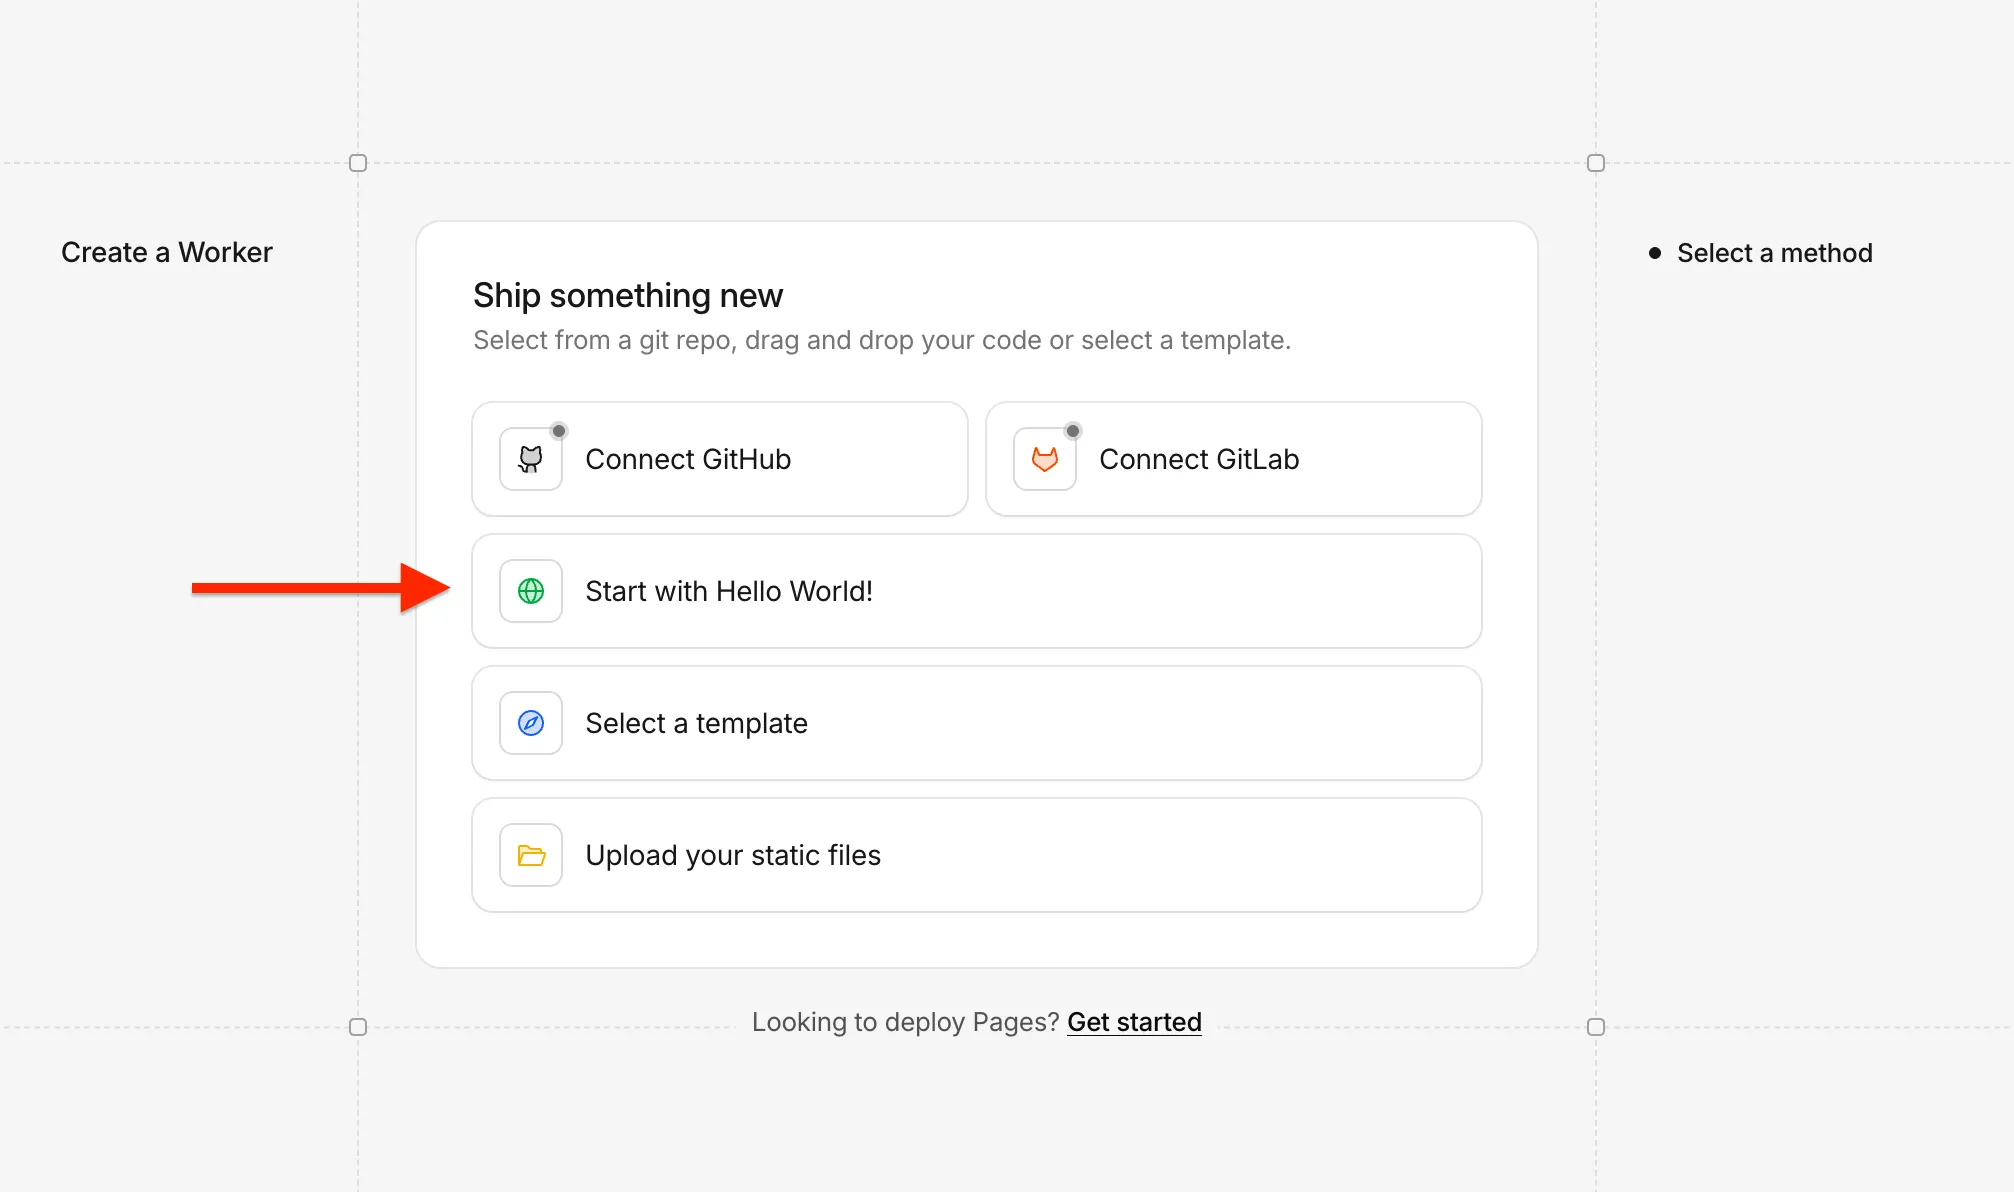
Choose a random name for your worker and click Deploy to proceed.
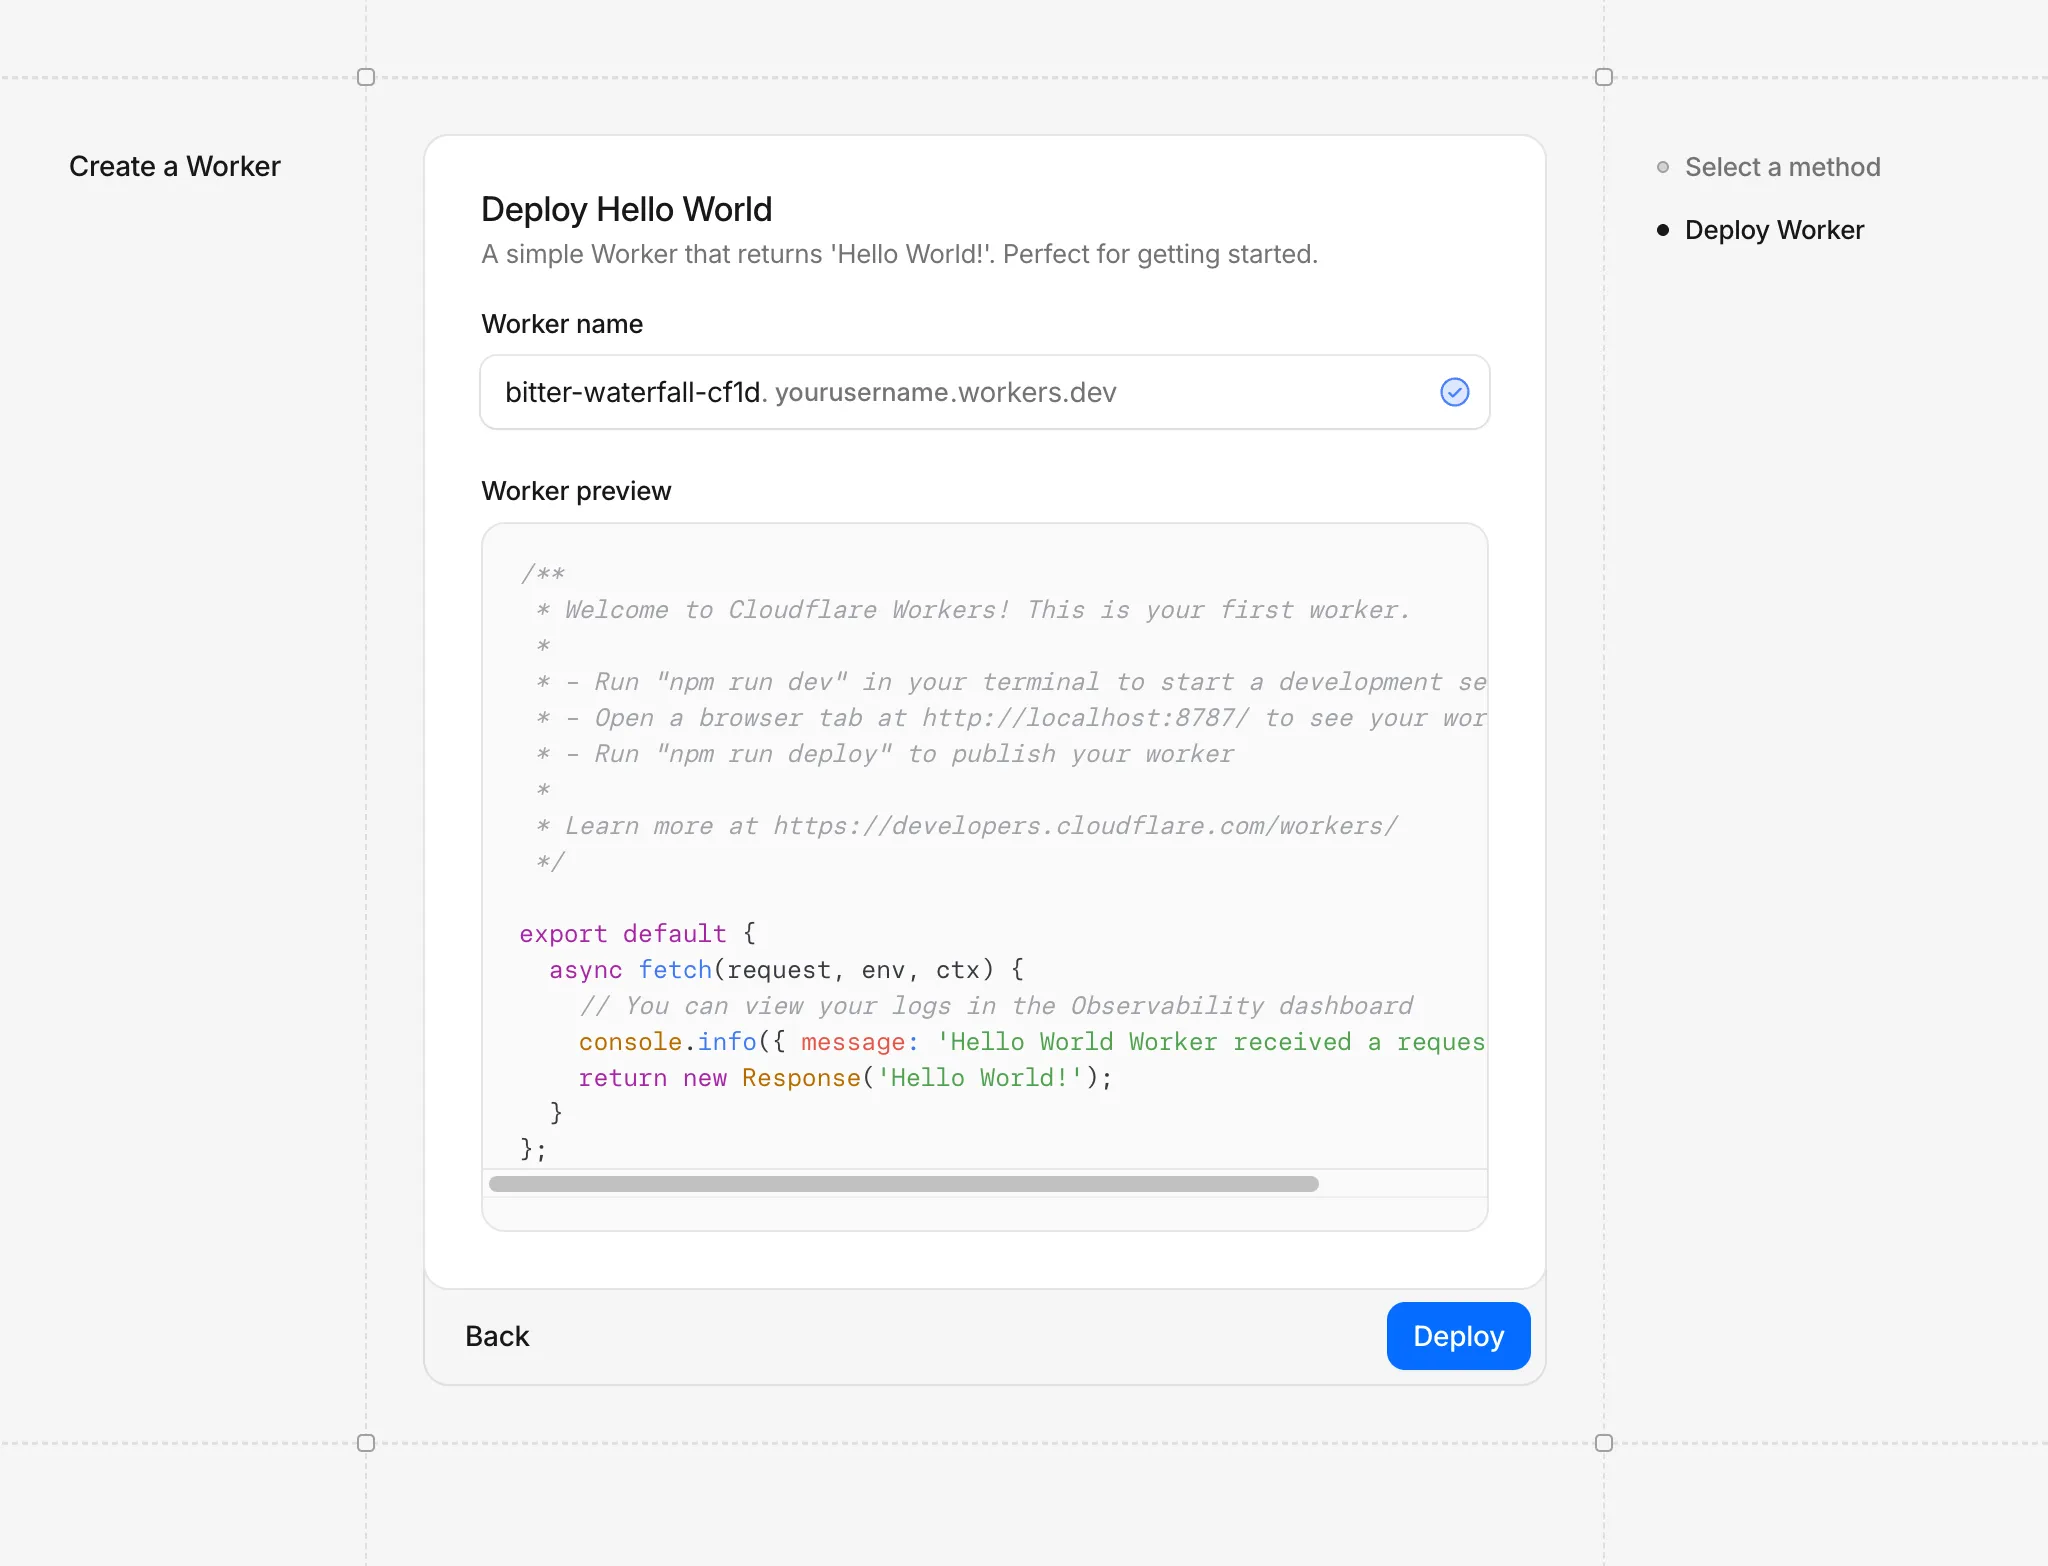
Note your Worker URL on this screen. We will use it in Settings tab when configuring the Super Preloader plugin.
If you forgot to save your Worker URL on a safe place, you can always obtain it from the Workers list at your Cloudflare dashboard.
Wait for a few seconds and your Hello World worker will be ready to edit.
Click Edit code to proceed.

Paste the following code into the worker.js as seen in the screenshot and click Deploy to save.
You can also download the Worker code from this Github Gist.

// Cloudflare Worker for the Super Preloader for Cloudflare WordPress plugin by WP Fix Fast
// Securely preloads and caches target URLs at the Cloudflare edge
// Plugin is intended to work with Webshare.io proxies
// Requires ?url= and valid ?token= based on SHA-256 HMAC-like hash of the URL and secret.
// Ensure to change SECRET with your random string and use it in the plugin settings
// Visit https://wpfixfast.com/blog/preload-cloudflare-cache/ for more details

const SECRET = 'my_random_string'

async function sha256(input) {
  const encoder = new TextEncoder()
  const data = encoder.encode(input)
  const hashBuffer = await crypto.subtle.digest('SHA-256', data)
  const hashArray = Array.from(new Uint8Array(hashBuffer))
  return hashArray.map(b => b.toString(16).padStart(2, '0')).join('')
}

export default {
  async fetch(request) {
    const url = new URL(request.url)
    const targetUrl = url.searchParams.get('url')
    const token = url.searchParams.get('token')

    if (!targetUrl) {
      return new Response('Missing ?url= param', { status: 400 })
    }

    const expectedToken = await sha256(targetUrl + SECRET)
    if (token !== expectedToken) {
      return new Response('Invalid token', { status: 401 })
    }

    const cache = caches.default
    const cachedResponse = await cache.match(targetUrl)

    if (cachedResponse) {
      return new Response('Already cached at this edge', { status: 200 })
    }

    const originResponse = await fetch(targetUrl, {
      headers: {
        'User-Agent': 'WP Fix Fast Super Preloader/1.0',
      },
      cf: { cacheEverything: true }
    })

    await cache.put(targetUrl, originResponse.clone())
    return new Response('Created cache at this edge', {
      status: 200,
      headers: {
        'cf-ray': request.headers.get('cf-ray') || ''
      }
    })
  }
}Don’t forget to change the my_random_string with any random string. We will then set this shared key at the Super Preloader settings tab.
The point is, by default, your Worker can be accessed by anyone. Cloudflare Free Plan limits the requests you can make to a worker.
So, by setting a shared key, we ensure that only your WordPress website that runs the Super Preloader plugin can access your Worker.

This completes the Cloudflare Worker setup.
You can now proceed with the Webshare proxy setup.
If you have any questions, please feel free to contact us for support using the blue Chat icon below.
How to Register and Use Webshare Proxies
In order to warm Cloudflare’s cache globally, you need your preload requests to come from different IP locations.
We built our plugin to work with Webshare.io’s proxies because:
- They offer free plans that include rotating proxies
- Their proxies support HTTPS connections, which is essential for security
- No signup complexity: generate a proxy list in seconds
- If you want access to a wider range of proxy locations, you can opt for one of their paid plans
Steps to use Webshare Proxy:
- Go to webshare.io
- Create a free account
- Proxy list is automatically generated on the dashboard’s 1st loading

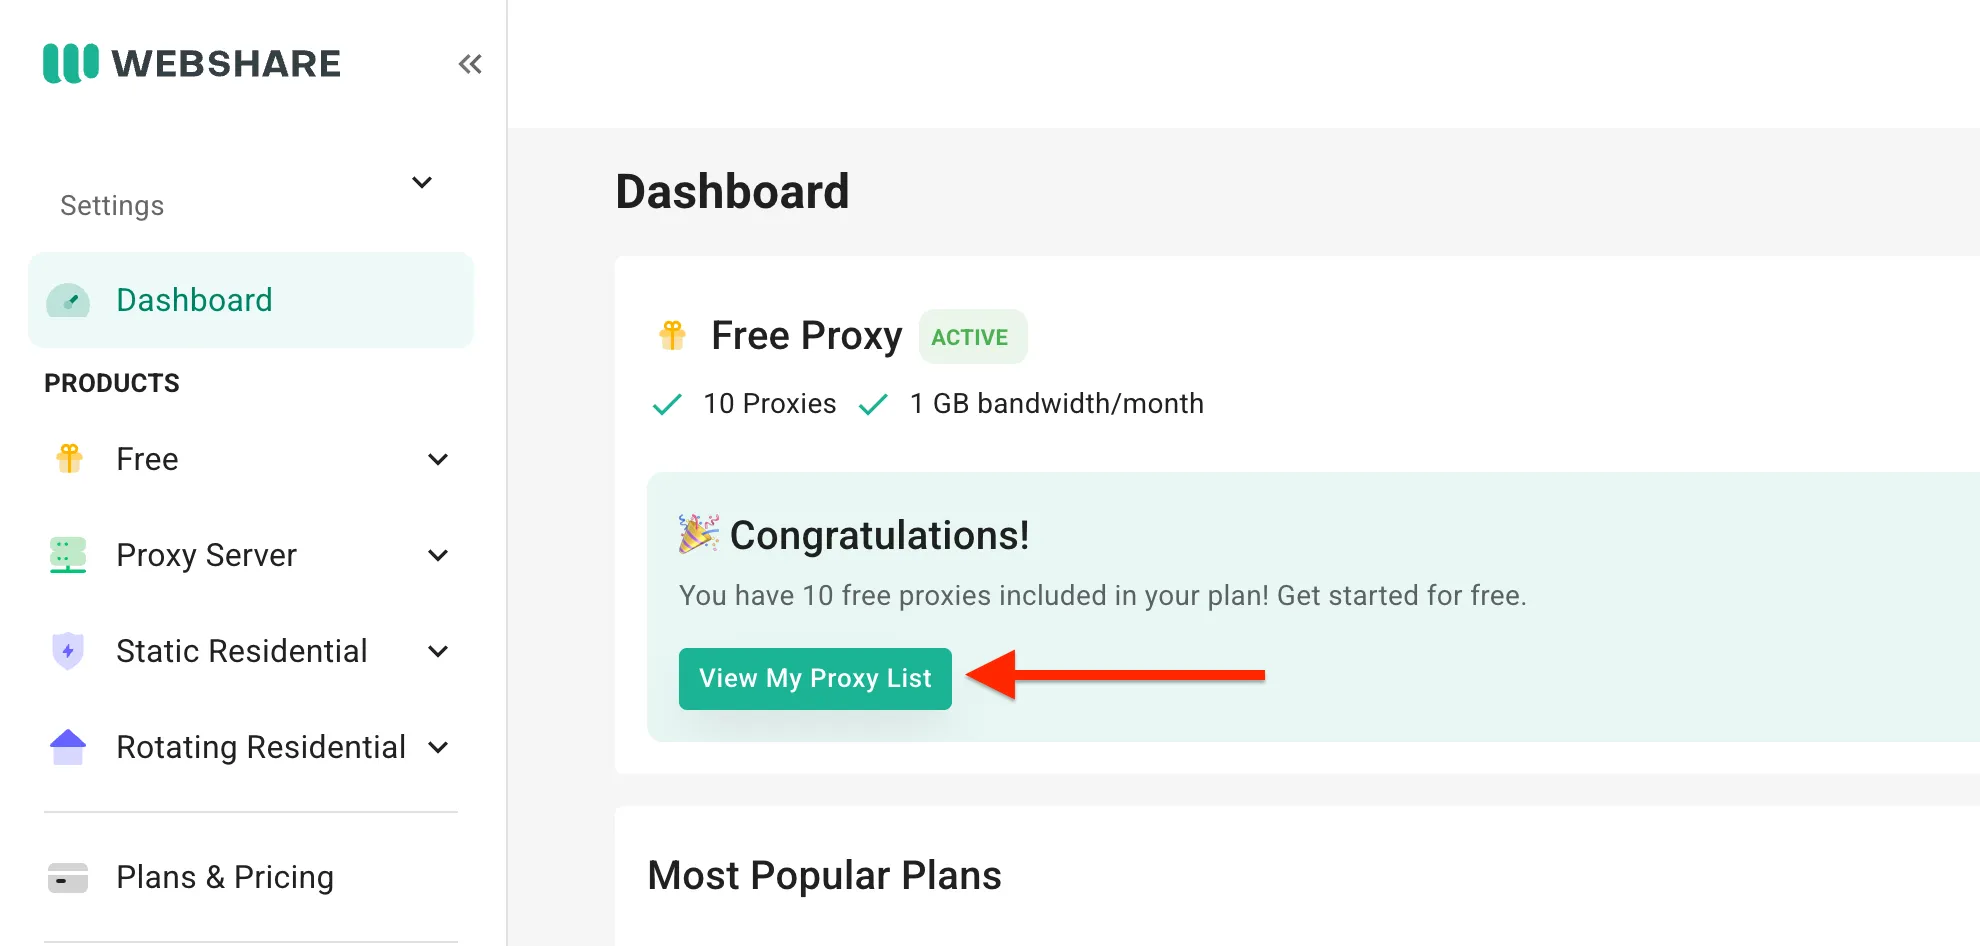
- Click View My Proxy List
- Choose the ip:port:username:password authentication format
- Choose the Backbone Connection method
- Click Download and copy the proxy list URL in the popup window

Save the Proxy List URL in a safe place, as we will set it in the Super Preloader settings shortly.
Webshare proxies rotate IPs across dozens of regions, ensuring Cloudflare edge servers around the world cache your pages from different locations.
Even with their free plan, proxy servers rotate periodically. In the proxy list table, you can see each proxy’s location (country).
Even though the proxies rotate periodically, your unique Proxy List URL does not change. So, you don’t need to manually update it in the plugin settings each time you have a new list of servers.
Our plugin only supports and works with Webshare-style proxy formats because of their reliability and support for authenticated HTTPS requests.
Install WP Fix Fast Super Preloader for Cloudflare Plugin
Navigate to your WordPress dashboard, Plugins and click Add Plugin
Search Super Preloader for Cloudflare and install the plugin from WordPress.org Plugin Directory.
You may also download the plugin and then upload manually.
Activate and click Settings.


How to Configure Super Preloader Settings
Click Settings on the plugins list or navigate to Settings > Super Preloader at your Wordpress dashboard.
Enter the Cloudflare Worker URL, Webshare Proxy List URL, and the Shared Secret that you generated in the previous steps.
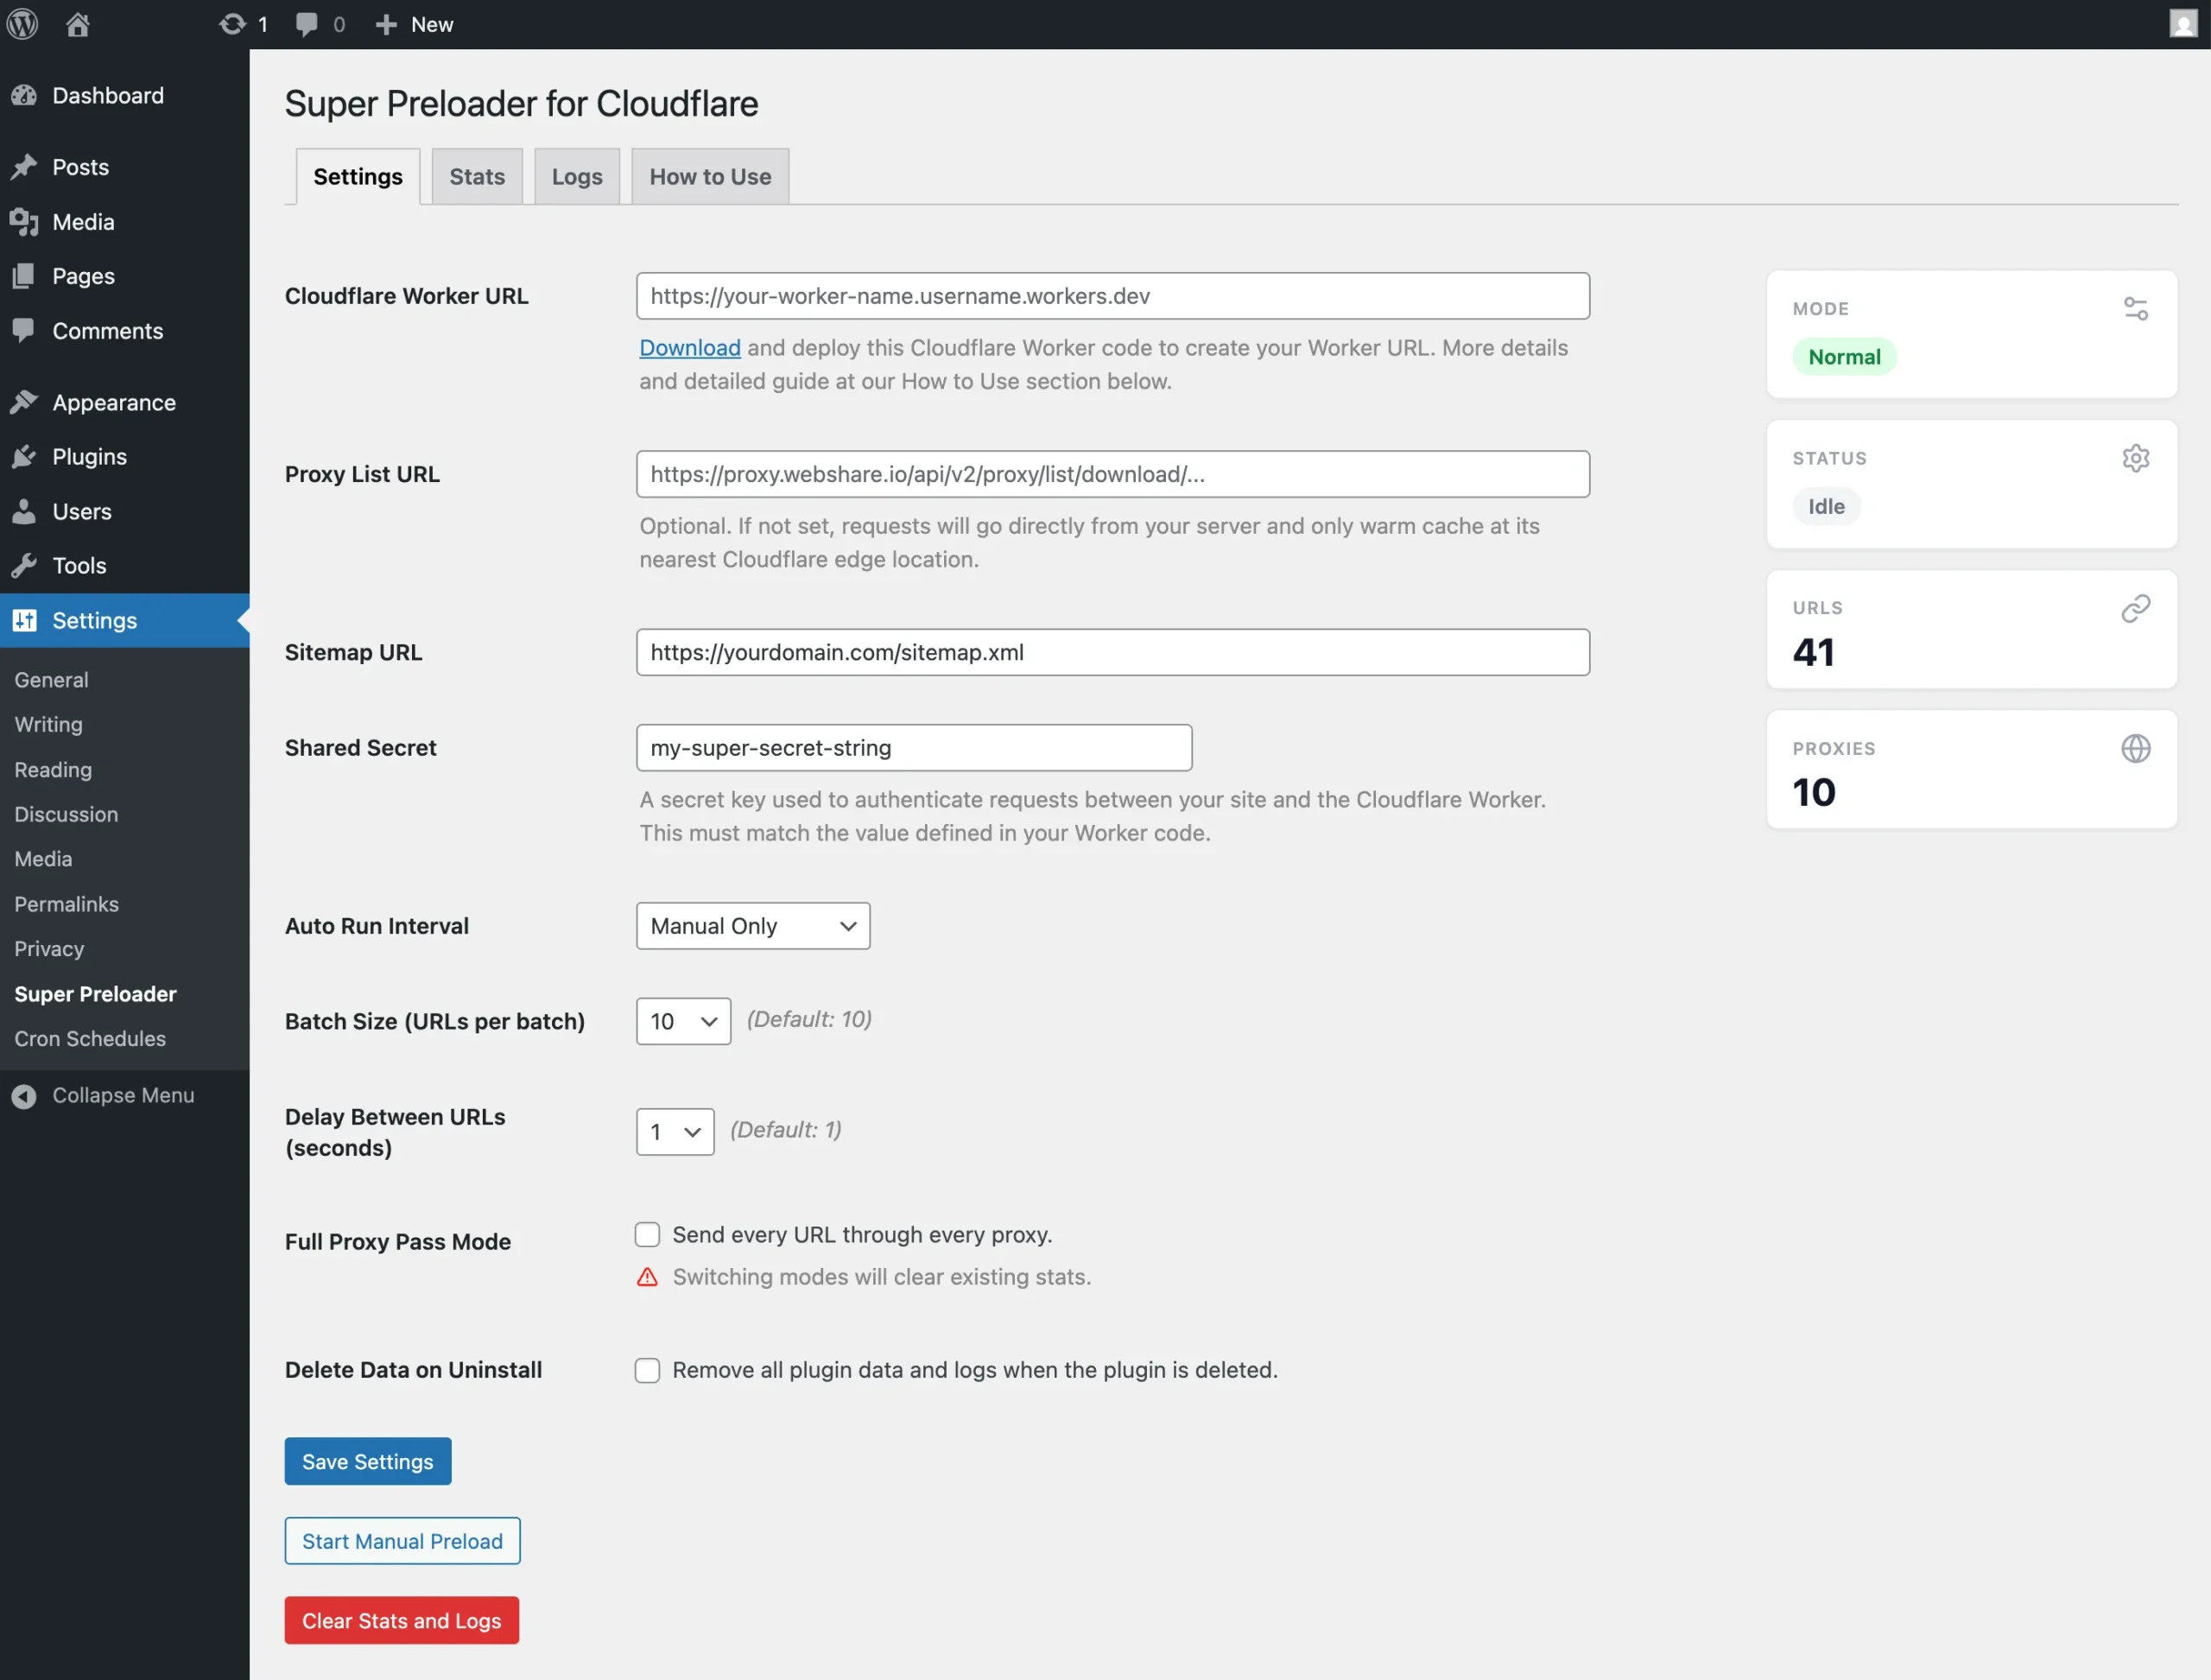
Sitemap URL is automatically filled in to the form as https://yourdomain.com/sitemap.xml but you can manually change it in case it is located at a different URL.
We recommend using one of the available SEO plugins such as Yoast SEO, RankMath SEO, or The SEO Framework plugin to automatically generate your sitemap.xml file.
Sitemap.xml files usually have sub xmls for pages, posts, images, and other custom post types. Our plugin finds all URLs from the main xml file.
After the initial preloader run, it will also display the number of discovered URLs in your sitemap.xml
Auto Run Interval sets a WordPress cron to run your preloader at set times, such as hourly, daily, twice-daily, and weekly. Run the preloader at least once and check the logs and stats to ensure it’s working properly before setting the auto run interval.
Batch Size determines how many URLs are processed in each run. Since many shared hosting providers impose strict time limits on how long a PHP script can run, setting this value too high may lead to timeout errors. If you experience such errors while running the preloader, try reducing the batch size until the process completes reliably.
Click Save Settings, then start the process by clicking Start Manual Preload. Make sure to stay on the page while the preloader runs. Navigating away will interrupt the PHP process and may prevent the first batch from completing.
You can safely navigate to Stats or Logs tabs when the first batch completes. It will continue running on the background to complete the remaining batches until all the URLs found in your sitemap.xml file are processed.
View Logs for Tracking the Process and Debugging
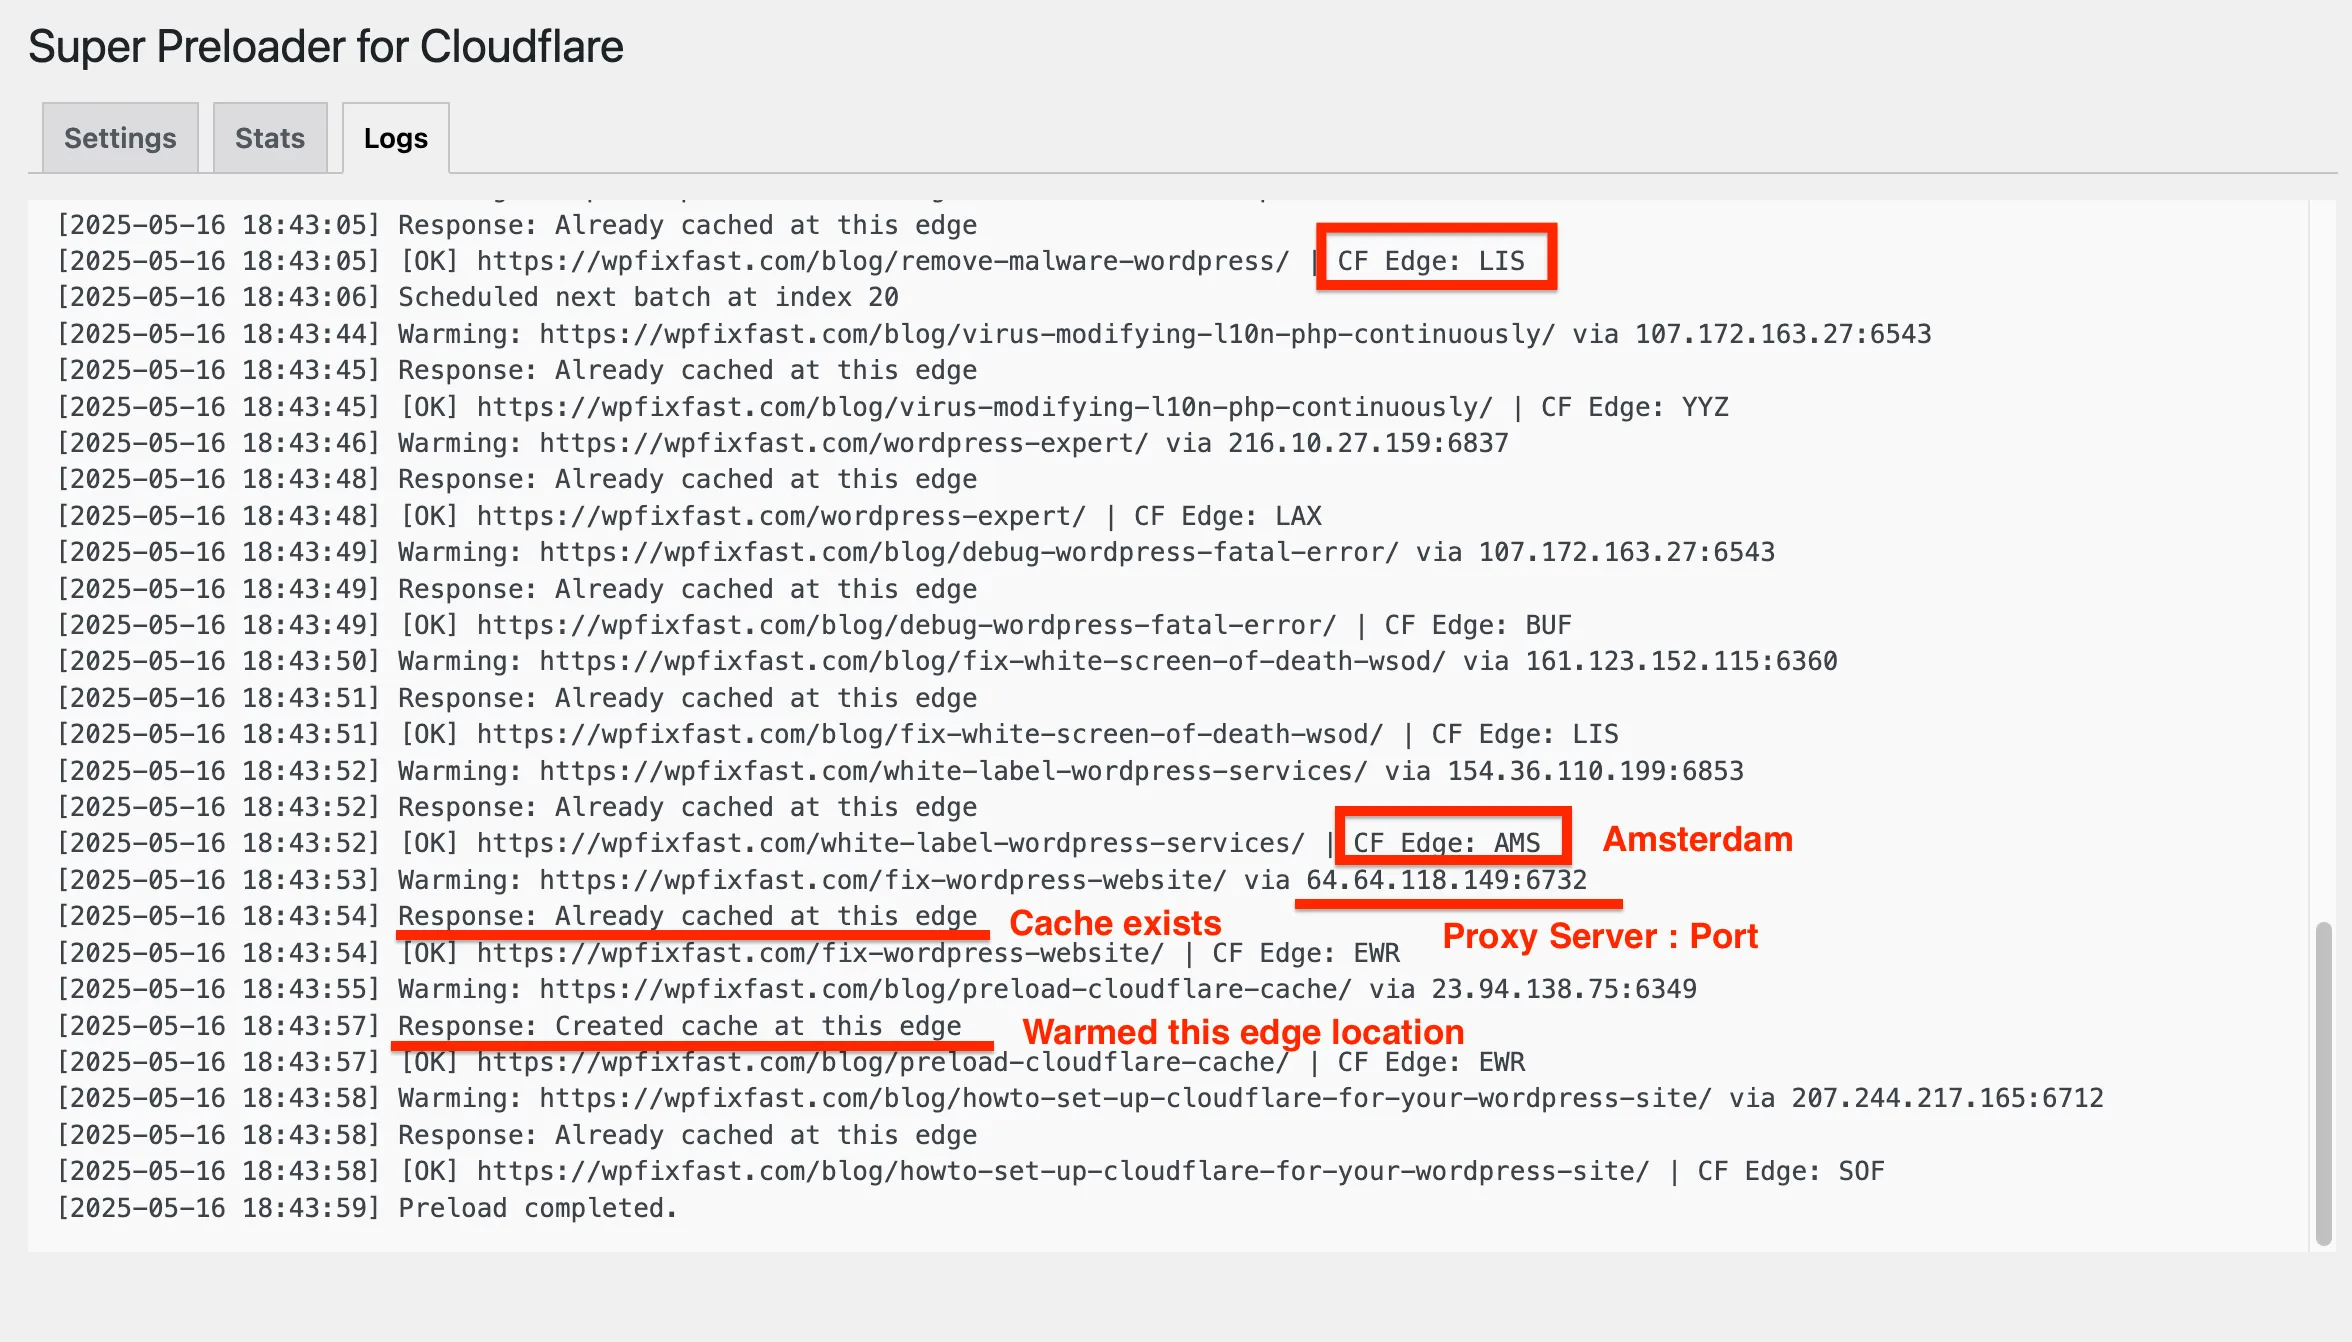
If you done the settings properly with all the necessary URLs, you should see a sample log similar to this one.
CF Edge shows the IATA airport code of the location that your URL was preloaded at. You may also view the proxy being used and the response received.
For example, you will either see Already cached at this edge, or Created cache at this edge. If there is an issue with your Cloudflare Worker or Webshare proxies, they will be logged here as well for debugging purposes.
If you prefer not to use Webshare proxies, Preloader will still run but will access your Cloudflare Worker from your server’s location, which will result in preloading your URLs at the nearest location to your web server.
Use Stats Tab to View Locations Where URLs Are Cached
Here is a sample Stats view that highlights the difference when using Webshare Proxies.
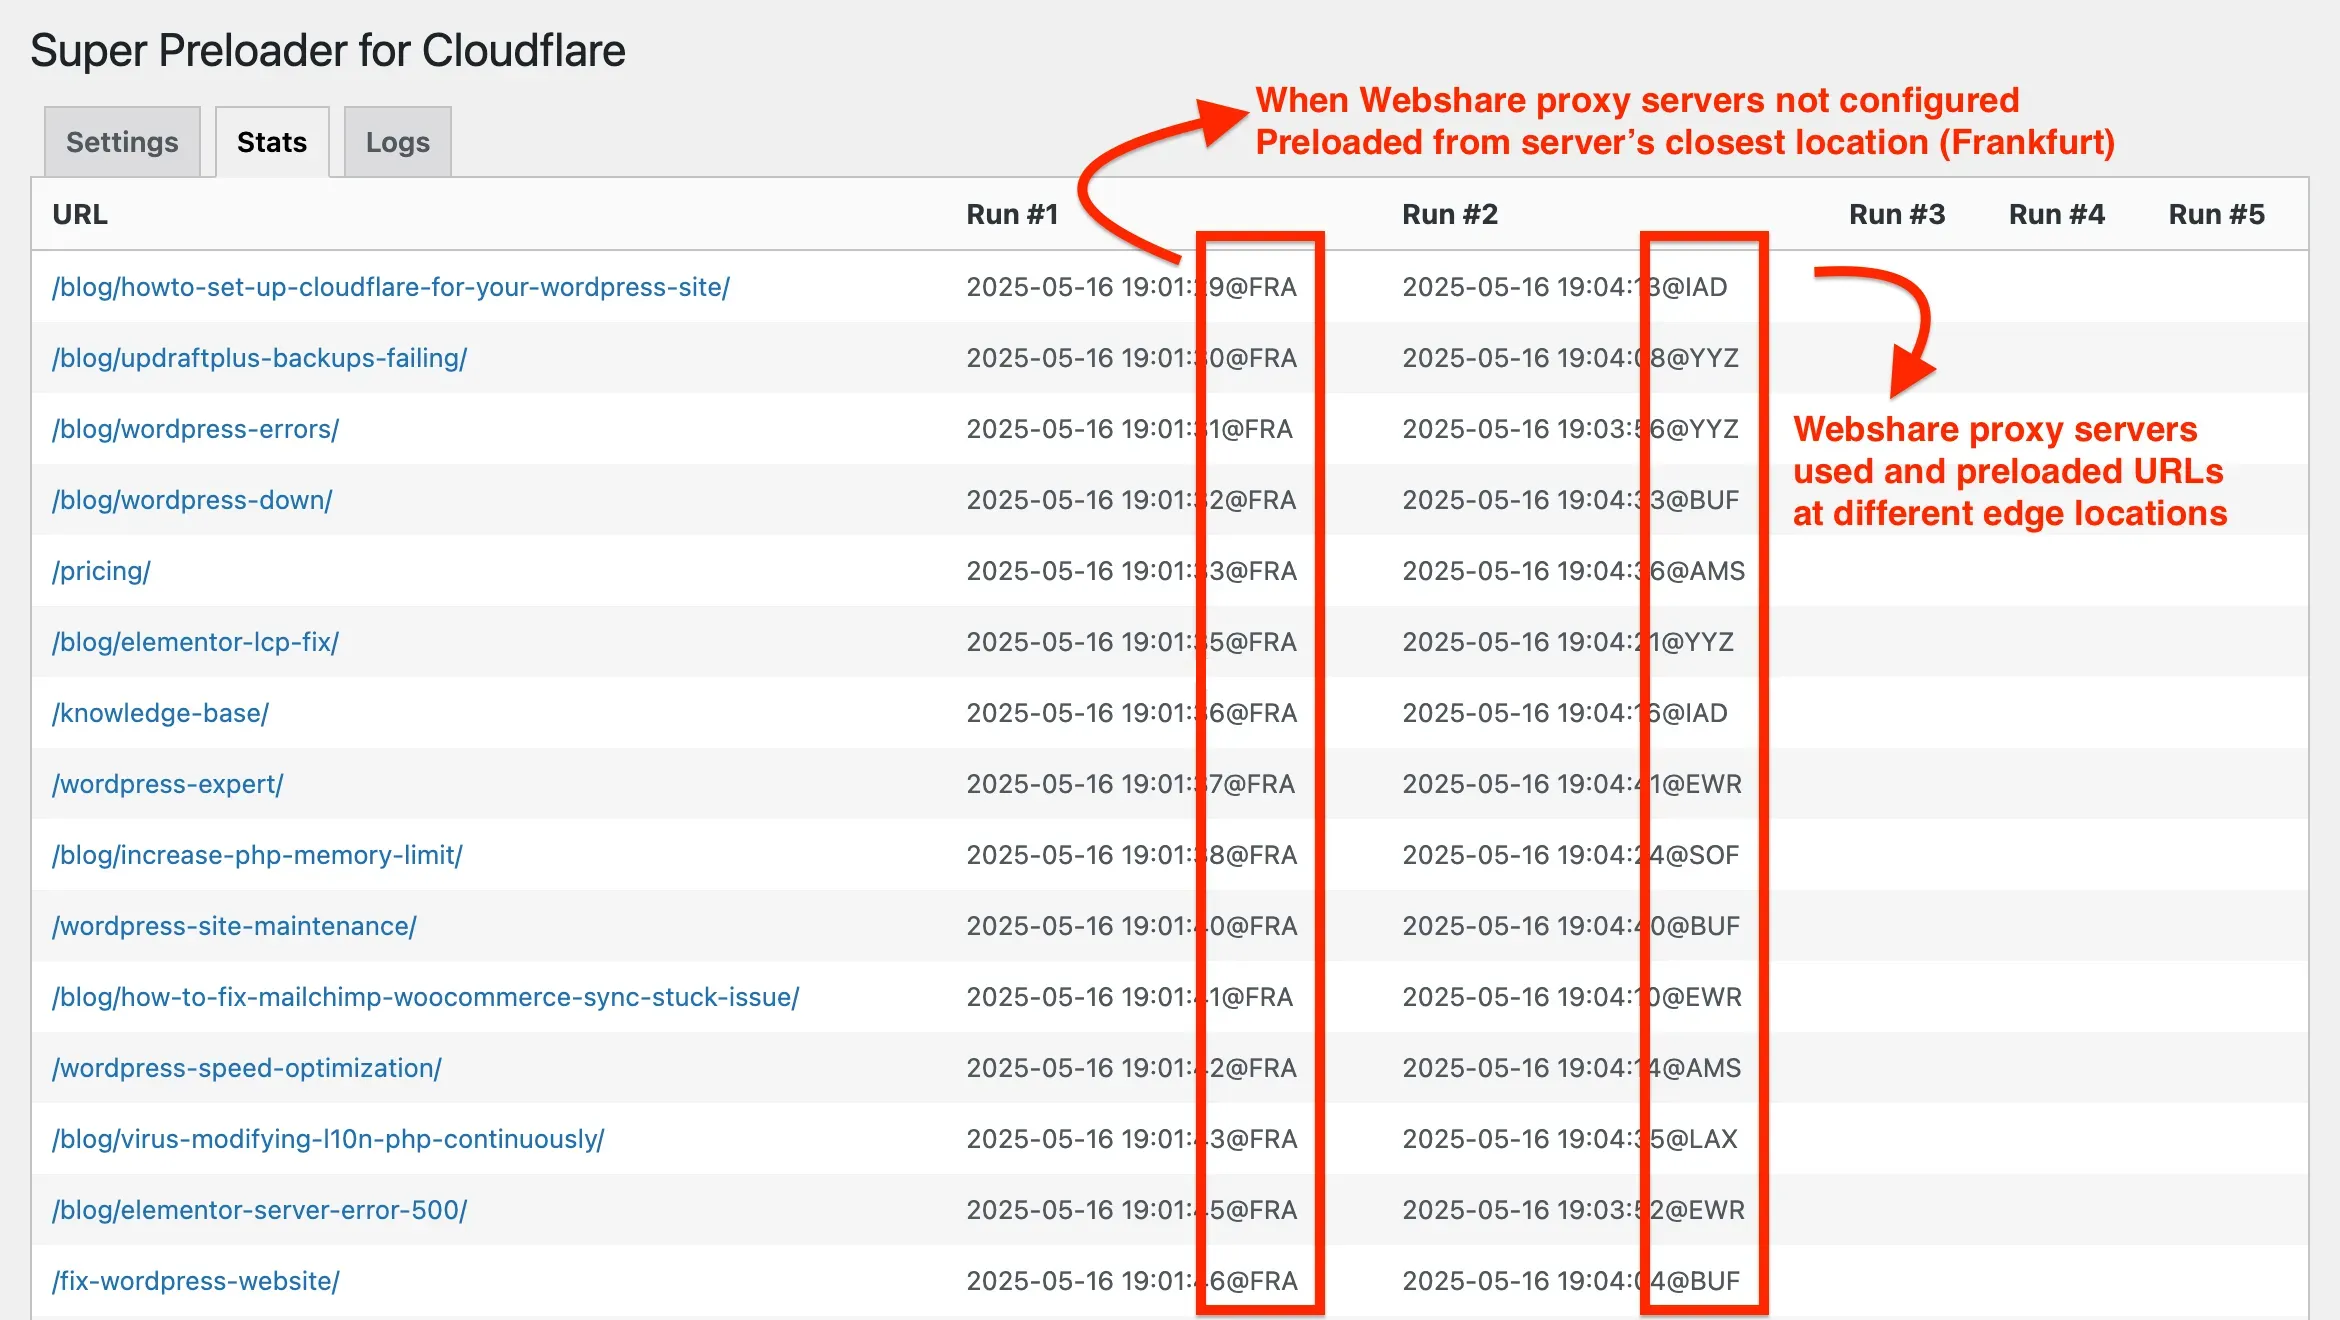
The dashboard now provides crystal-clear insights into your preloading performance across Cloudflare’s network (300+ cities in 125+ countries).
This makes it much easier to monitor your site’s regional coverage.
Using the color-coded tooltips, you can check which URLs are preloaded at which Cloudflare edge location by hovering over the colored location name (e.g., LAX: Los Angeles, US, PRG: Prague, CZ, and YYZ: Toronto, CA).

Quick Tip: By adding more proxy servers to your Webshare.io account, you can increase your coverage.
Usage Notes and Key Considerations
Here are a few important things to know while using the Super Preloader plugin:
- Cloudflare does not cache HTML by default. That’s why we recommend pairing this plugin with Super Page Cache, which enables full-page caching on Cloudflare.
- Batch size matters. PHP has execution timeouts. By splitting URLs into batches (e.g., 10 at a time), you avoid timeouts and can run preloads reliably via cron jobs.
- Shared secret is mandatory. Without a secret, anyone could send requests to your Worker, potentially triggering abuse or excessive traffic. Always keep your token private.
- Only preloaded locations are fast. Preloading doesn’t instantly make your site fast globally. It simply ensures that specific edge locations have your content cached before a visitor hits it.
- Use responsible batch sizes and intervals. Our plugin is optimized to respect Cloudflare’s infrastructure and avoid hitting rate limits.
- Only Backbone Connection method worked for us. Webshare.io provides different types of connection options to their proxies. Even though direct connection type worked on our development server, it didn’t work on our web server. So, we highly recommend you test both on your setup.
- Full Proxy Pass mode sends every URL through every proxy. This maximizes edge coverage but significantly increases run time and request volume. Stats are not recorded in this mode. Use it occasionally for a thorough cache warm-up, not as your regular scheduled interval.
How to Check Cache from Your Location
Both Stats and Logs tabs allow you to view whether the preloader is working or not.
If you want to check if any URL of your website is cached at the closest edge location, open a new Chrome browser in Incognito mode, because Cloudflare cache will BYPASS if you have any cookies, such as the wordpress_logged_in cookie.
Enter your homepage, or any other URL, then, right click on anywhere on the page and click Inspect to open up the Dev Tools.
Ensure that Disable Cache is not checked, click the Network tab and select Doc. Refresh the page now and check the Headers as seen in the screenshot below.
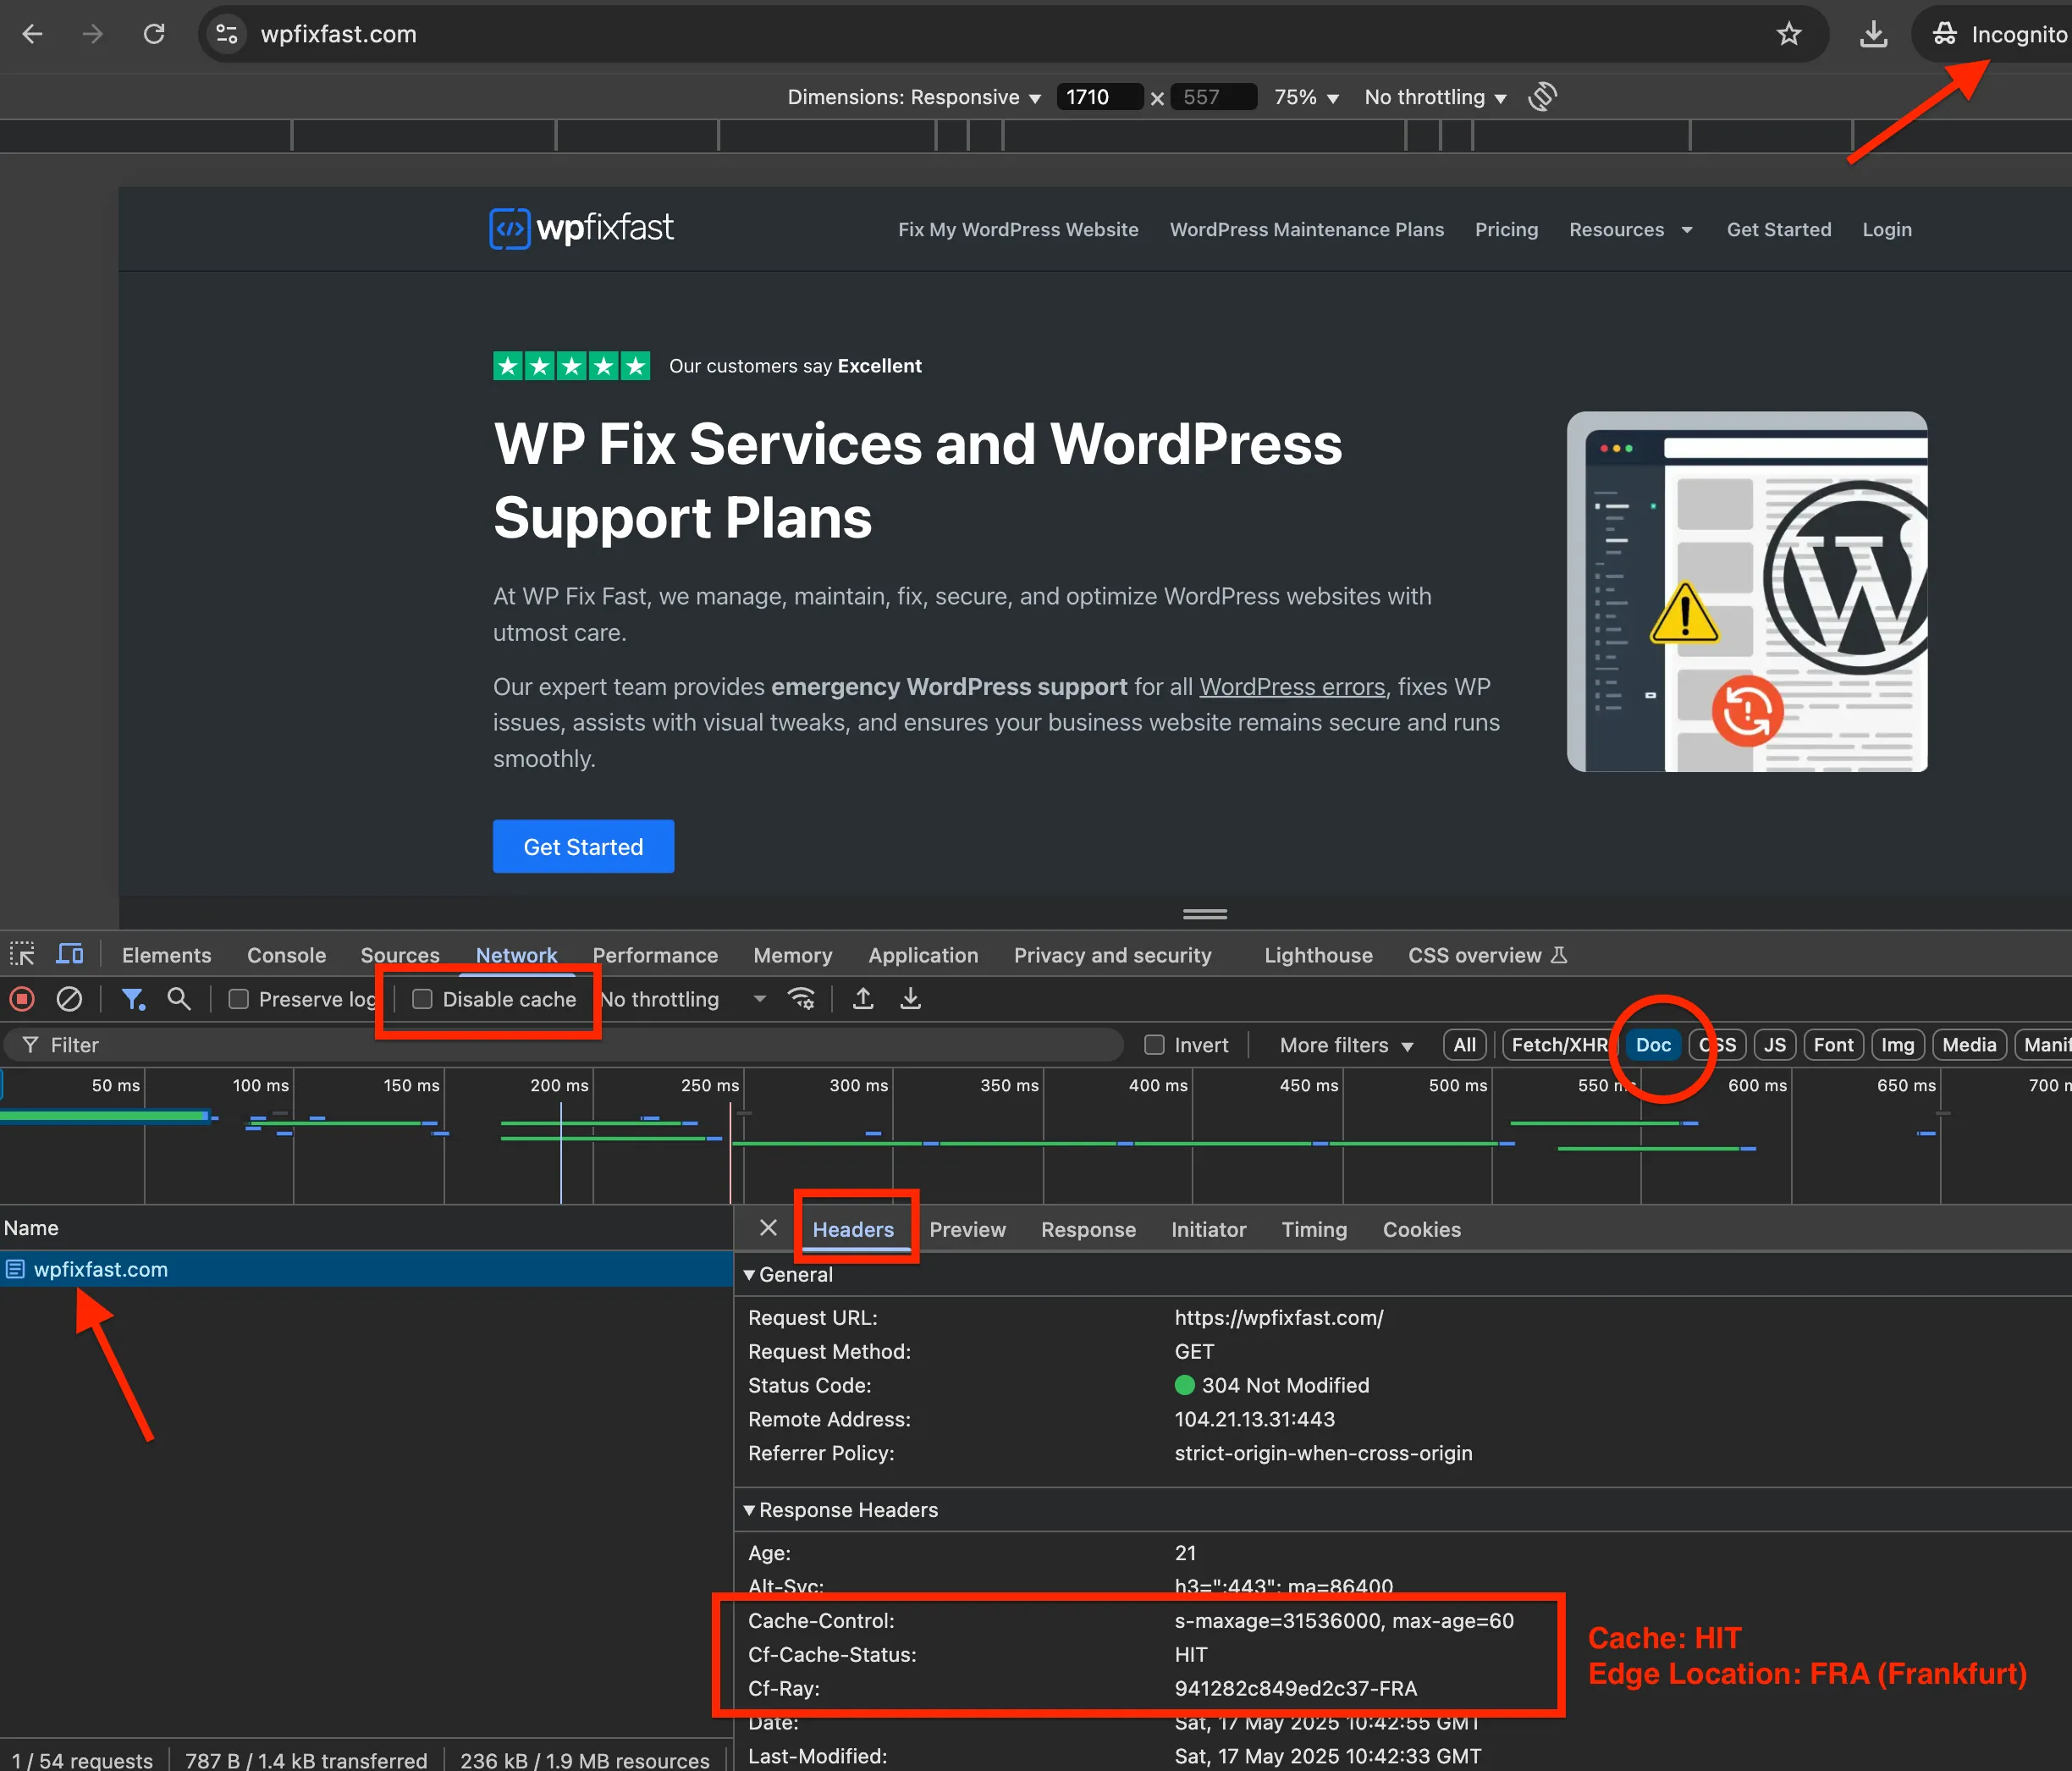
Cf-Cache-Status header should display: HIT, MISS, DYNAMIC or BYPASS.
HITmeans your URL is cached on the Cloudflare edge location shown at theCf-Rayheader.
MISSmeans refresh the page and check again. If everything is properly set, you should see HIT.
DYNAMICmeans full page cache at Cloudflare is not active yet.
BYPASSmeans, probably you forgot to uncheck the Disable cache setting, or you have a cookie. Clear the cookies in the Application tab of Dev Tools, uncheck the Disable cache and try reloading the page.
Conclusion
Preloading Cloudflare Cache is not a single-click setup. It requires some initial preparation. You willl need to deploy a custom Cloudflare Worker, obtain a proxy list (like Webshare), and ensure your site generates a proper sitemap.
Once configured, though, the benefits are significant: faster global load times, improved cache hit rates, and better Core Web Vitals scores, especially for first-time visitors.
Visit the plugin support forum to create a new ticket or view existing resolved tickets.
Would you like to support the advancement of this plugin? Donate here.
Changelog
We continue to update the plugin and improve it by adding new features and bug fixes.
1.1.1 – 29.06.2026
- Fixed: Checkboxes next to URLs in the Exclusions tab now exclude URLs as “exact match” rather than “contains” matching.
1.1.0 – 27.06.2026
- Added: New “Exclusions†tab that allows manual and keyword-based URL exclusions
- Added: Optional “Start Preload†shortcut in the WordPress admin bar to trigger a manual preload from any page
- Added: Auto-dismissing toast notifications confirm when the preload starts and completes
- Added: Live remaining URL count shown in the sidebar and next to the admin bar shortcut while a run is in progress
- Improved: Admin bar shortcut reflects the real running state immediately, whether the preload was started manually or via the scheduled cron
- Tested: Compatibility with WordPress 7.0
Thanks to @masvil once again for feedback and feature requests.
1.0.8 – 12.05.2026
- Updated: Screenshots, how to use guide, and donate plugin link. Thanks for feedback @masvil
1.0.7 – 16.04.2026
- Fixed: Sitemap download timeout increased to 30 seconds to prevent cURL error 28 on slow servers
- Refactor: Code internals for better bompatibility with WordPress coding standards
1.0.6 – 11.03.2026
- Refactor: Converted plugin internals to class-based architecture for improved maintainability
- Improved: Overlapping run protection. If a cron event fires while a run is already in progress, it is automatically skipped
- Improved: Auto-refresh logs are now enabled by default on the Logs tab
- Added: Full proxy pass mode that sends every URL through every proxy for maximum Cloudflare edge coverage
- Added: New sidebar on the Settings page shows current mode, running or idle status, last run times, URL count and proxy count
1.0.5 – 16.02.2026
- Added: Extra intervals 3hrs, 6hrs, 12 hrs, and custom
- Added: Next scheduled run date/time display
1.0.4 – 25.12.2025
- Improved: HTTP request helper function to always send a clear User-Agent. Thanks for feedback @gregywordpress
- Improved: Preloader by increasing cursor time out to 24 hours to avoid incomplete batches
- Added: Delay between URLs setting to adjust wait time in seconds between each URL preload
- Added: Auto-refresh to log viewer
- Added: Stop preloader button to cancel the running preloading process