If you have a WordPress site, you’re probably using WP-Cron without even realizing it.
I decided to write this blog post on WP-Cron, because it has two main drawbacks you should be aware of.
These drawbacks may affect both performance and functionality of your website.
Understanding how WP-Cron works enables you to make an informed decision about whether to implement a more dependable scheduling method and avoid potential performance issues.
What is WP-Cron
WordPress has a built-in system called WP-Cron that handles time-based tasks.
Think of it as an automated scheduler that performs actions at specific times, like publishing a blog post on a set date, sending emails when triggered, or automatically backing up your website’s data.
Why disable WP-Cron
WP-Cron relies on website visitors to trigger the scheduled tasks. Without visitor activity, your scheduled tasks (actions) may not execute on time.
This dependency on traffic makes it less reliable for low-traffic websites or time-sensitive operations.
On the other hand, multiple scheduled tasks can accumulate and execute simultaneously when a visitor arrives, creating sudden spikes in server resource usage.
This can slow down page load times and degrade the user experience. On sites with heavy scheduling loads or inconsistent traffic patterns, these performance dips become more noticeable and problematic.
Disabling WP-Cron and switching to a server-side cron job or alternative scheduling solution ensures your tasks run reliably and eliminates sudden performance drops.
Let’s take a look at how to easily disable WP-Cron and set up a proper cron job run by your web server’s operating system.
WordPress 6.9 improves WP-Cron performance
Good news for WordPress users who haven’t disabled WP-Cron yet: WordPress 6.9 (released in December 2nd, 2025) brings a significant performance improvement that addresses one of the main issues I’ve discussed above.
What changed in WordPress 6.9?
The WordPress core team moved WP-Cron spawning from the init hook to the shutdown hook. This might sound like a minor technical detail, but the impact on your site’s speed can be substantial.
For those who are interested in the technical details, you may read the discussions here.
The problem before 6.9
Previously, when someone visited your site, WordPress would try to spawn WP-Cron during the page load process.
Even though it was supposed to be a non-blocking background request (using blocking => false), it wasn’t actually working as intended.
This meant your visitor had to wait for WP-Cron to finish spawning before their page would load, potentially adding up to 1 second to your Time to First Byte (TTFB).
How 6.9 fixes this
By moving WP-Cron to the shutdown hook, WordPress now waits until after the page content has been delivered to your visitor before spawning cron tasks.
The real-world impact:
- Faster TTFB: Up to 1 second improvement when WP-Cron spawns
- Better user experience: Pages load faster, especially on the first visit
- No breaking changes: Everything works exactly as before, just faster
Should you still disable WP-Cron?
While the improvements came with WordPress 6.9 are important, the fundamental limitations of WP-Cron remain:
- It still depends on visitor traffic to trigger scheduled tasks
- Multiple tasks can still execute simultaneously when triggered
- Time-sensitive operations may not run exactly when needed
For high-traffic sites or mission-critical scheduled tasks, disabling WP-Cron and using a proper server-side cron job is still the recommended approach.
However, if you’re running a smaller site with moderate traffic, WordPress 6.9’s improvement makes the default WP-Cron much more acceptable from a performance standpoint.
Disabling WP-Cron in WordPress
To disable WP-Cron, simply add the following line to your wp-config.php file, found in the root folder of your WordPress installation.
The easiest way to do this is using your hosting provider’s file manager or through FTP (File Transfer Protocol)
define('DISABLE_WP_CRON', true);You can add it after the “stop editing” line as seen below.
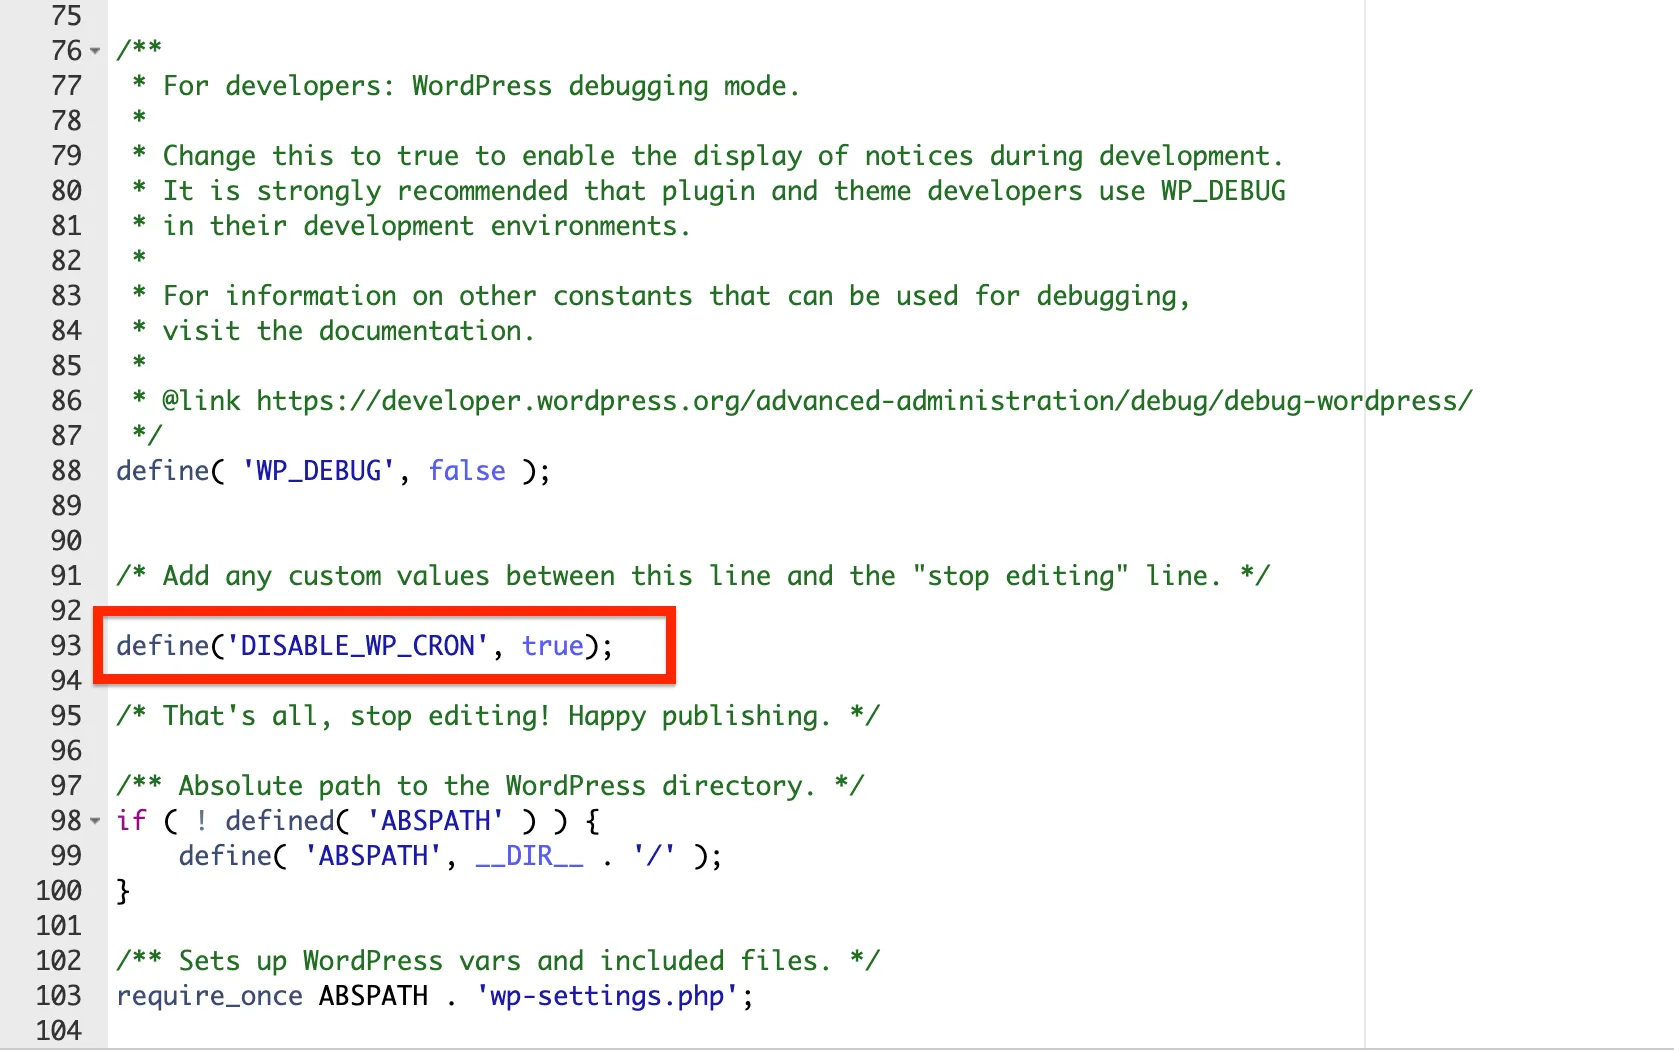
WordPress will no longer trigger WP-cron when someone visits your website.
So, we need to trigger the scheduled tasks either by using the cron job system of your web host, or through a third-party service.
Setting up a cron job on your hosting control panel
Most popular control panels have cron job feature. So, it’s pretty much the same how to configure it.
In this article, I’ll show how to do it using cPanel.
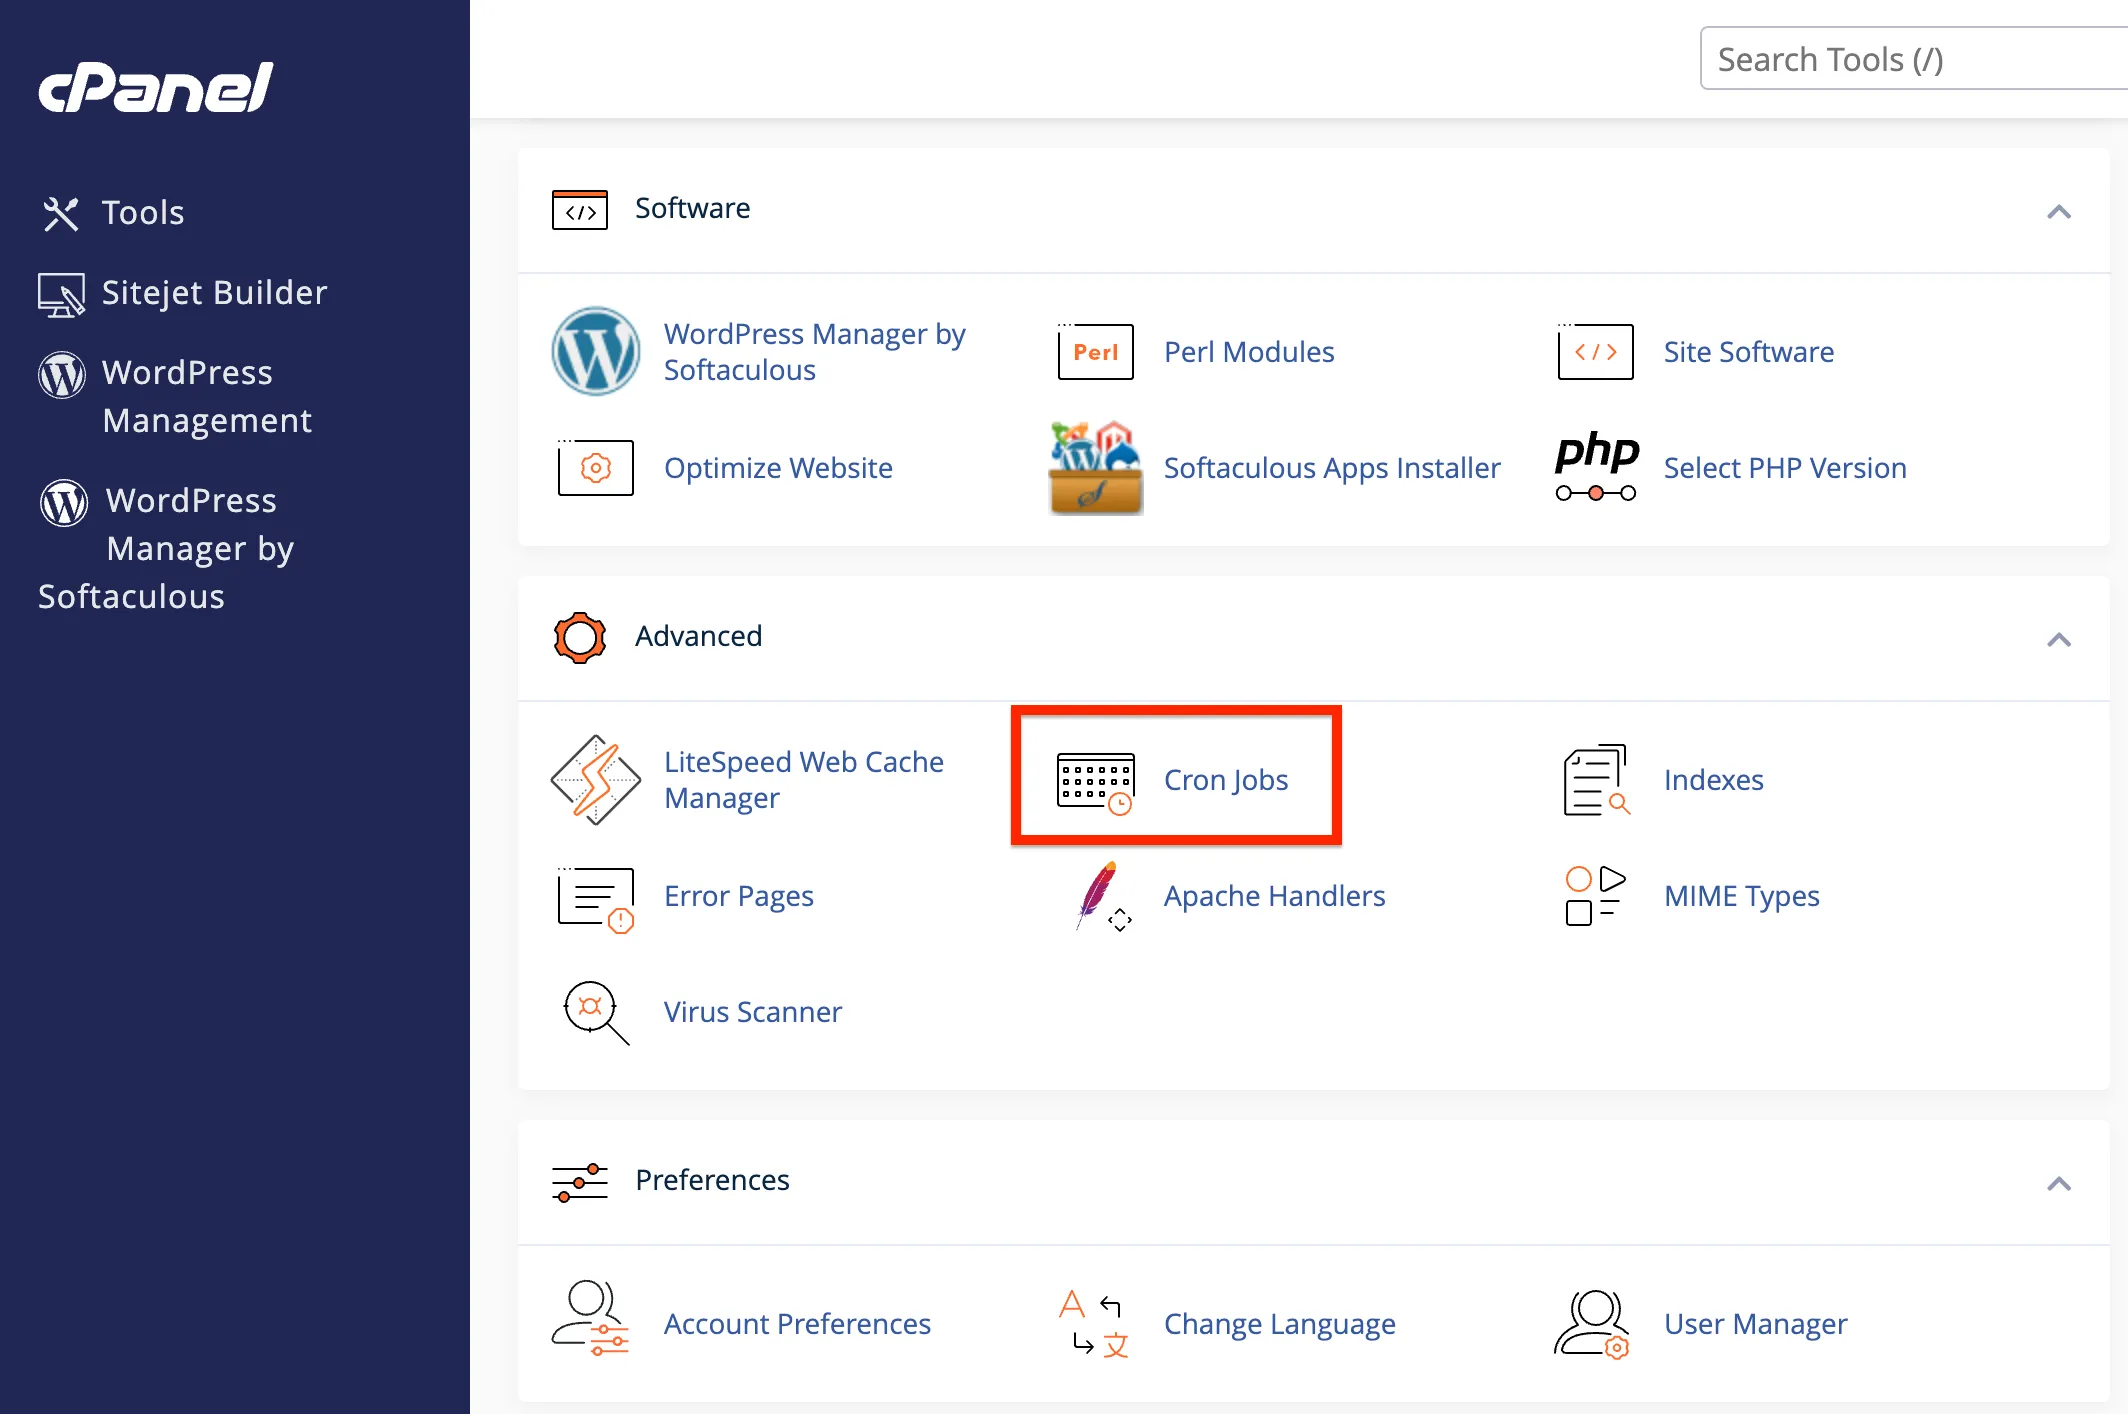
Simply, open up your cPanel and find Cron Jobs under the Advanced panel.
Don’t worry about the warning about the Linux commands. I’ll guide you step-by-step.

Scroll down on the page to the Add New Cron Job section and set up a cron job.
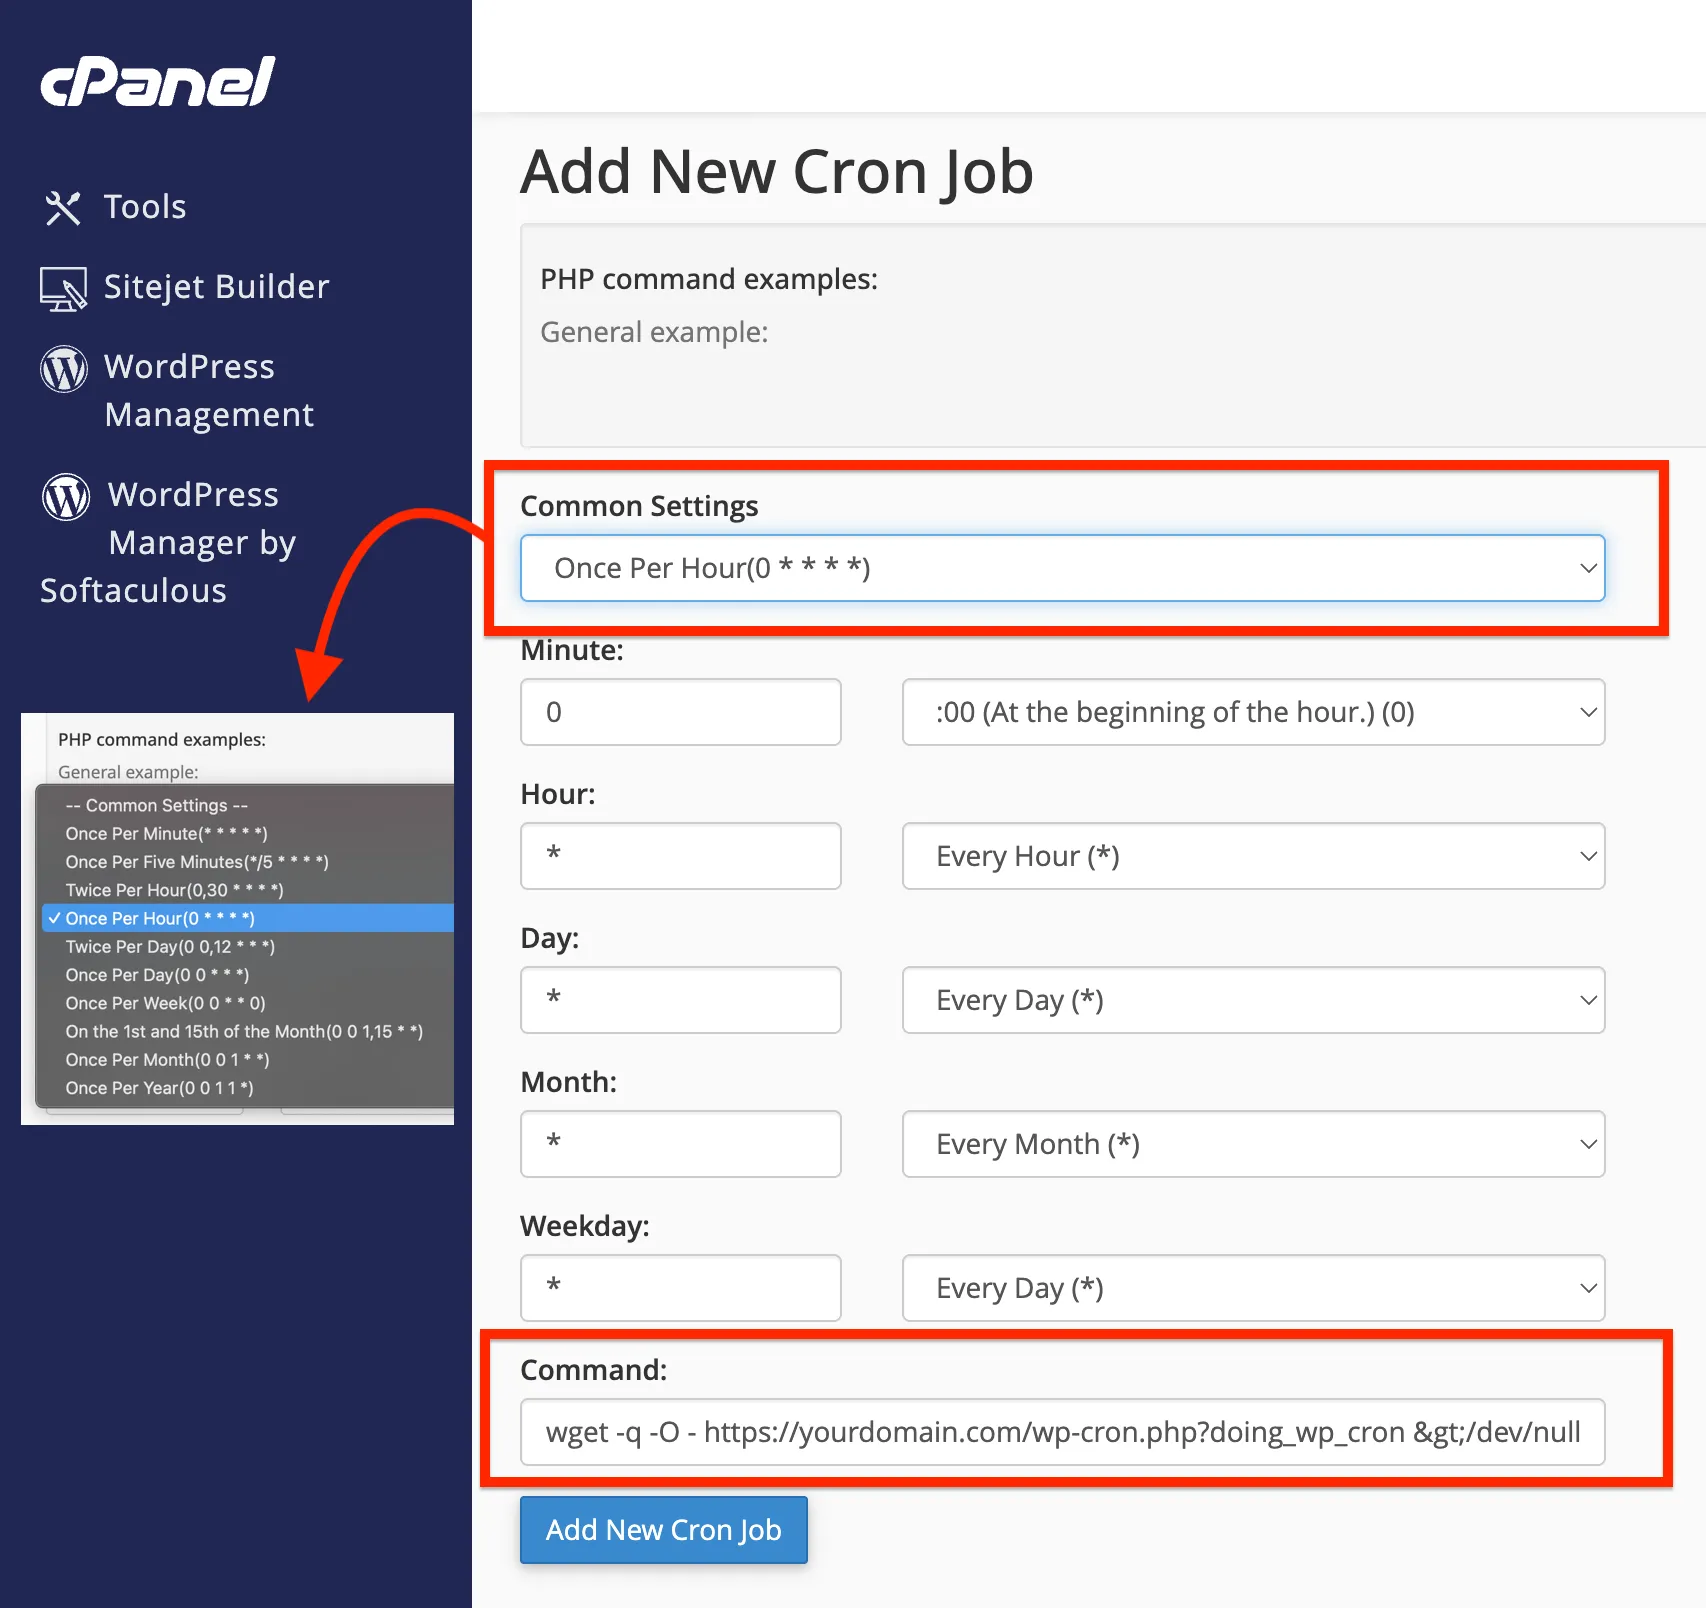
I’ve marked the 2 important fields here.
First one, Common Settings, makes it easy to select and prefill timing related fields below.
For example, if you want to trigger your scheduled tasks every hour, simply select Once Per Hour.
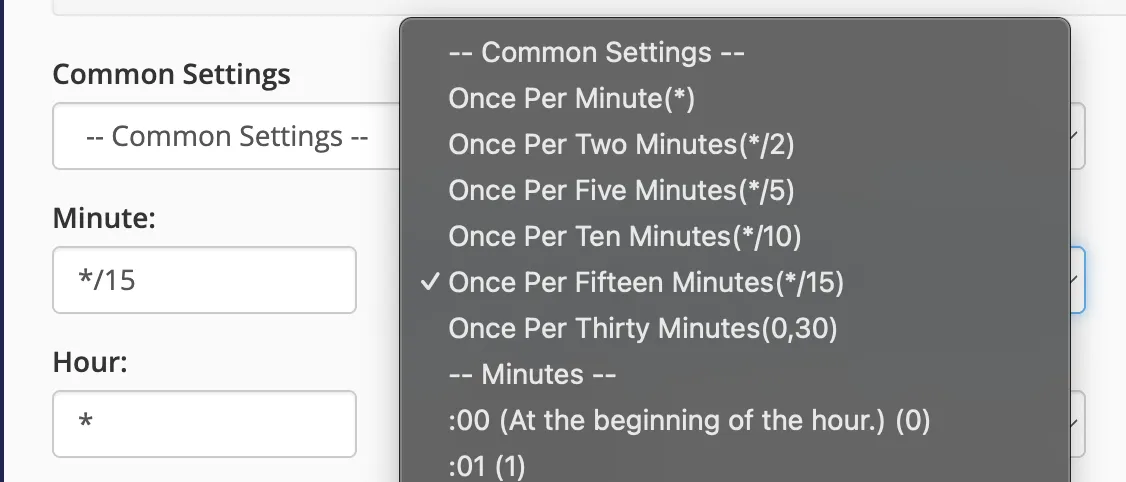
Adjust timing according to your needs. If you have tasks that need to run every 15 minutes, than click the dropdown next to the Minute and choose one of the pre-defined common settings as follows. It will fill the Minute field as */15, which means that every 15th minute.
Next copy paste this line to the Command field and replace “https://yourdomain.com” with your website’s URL.
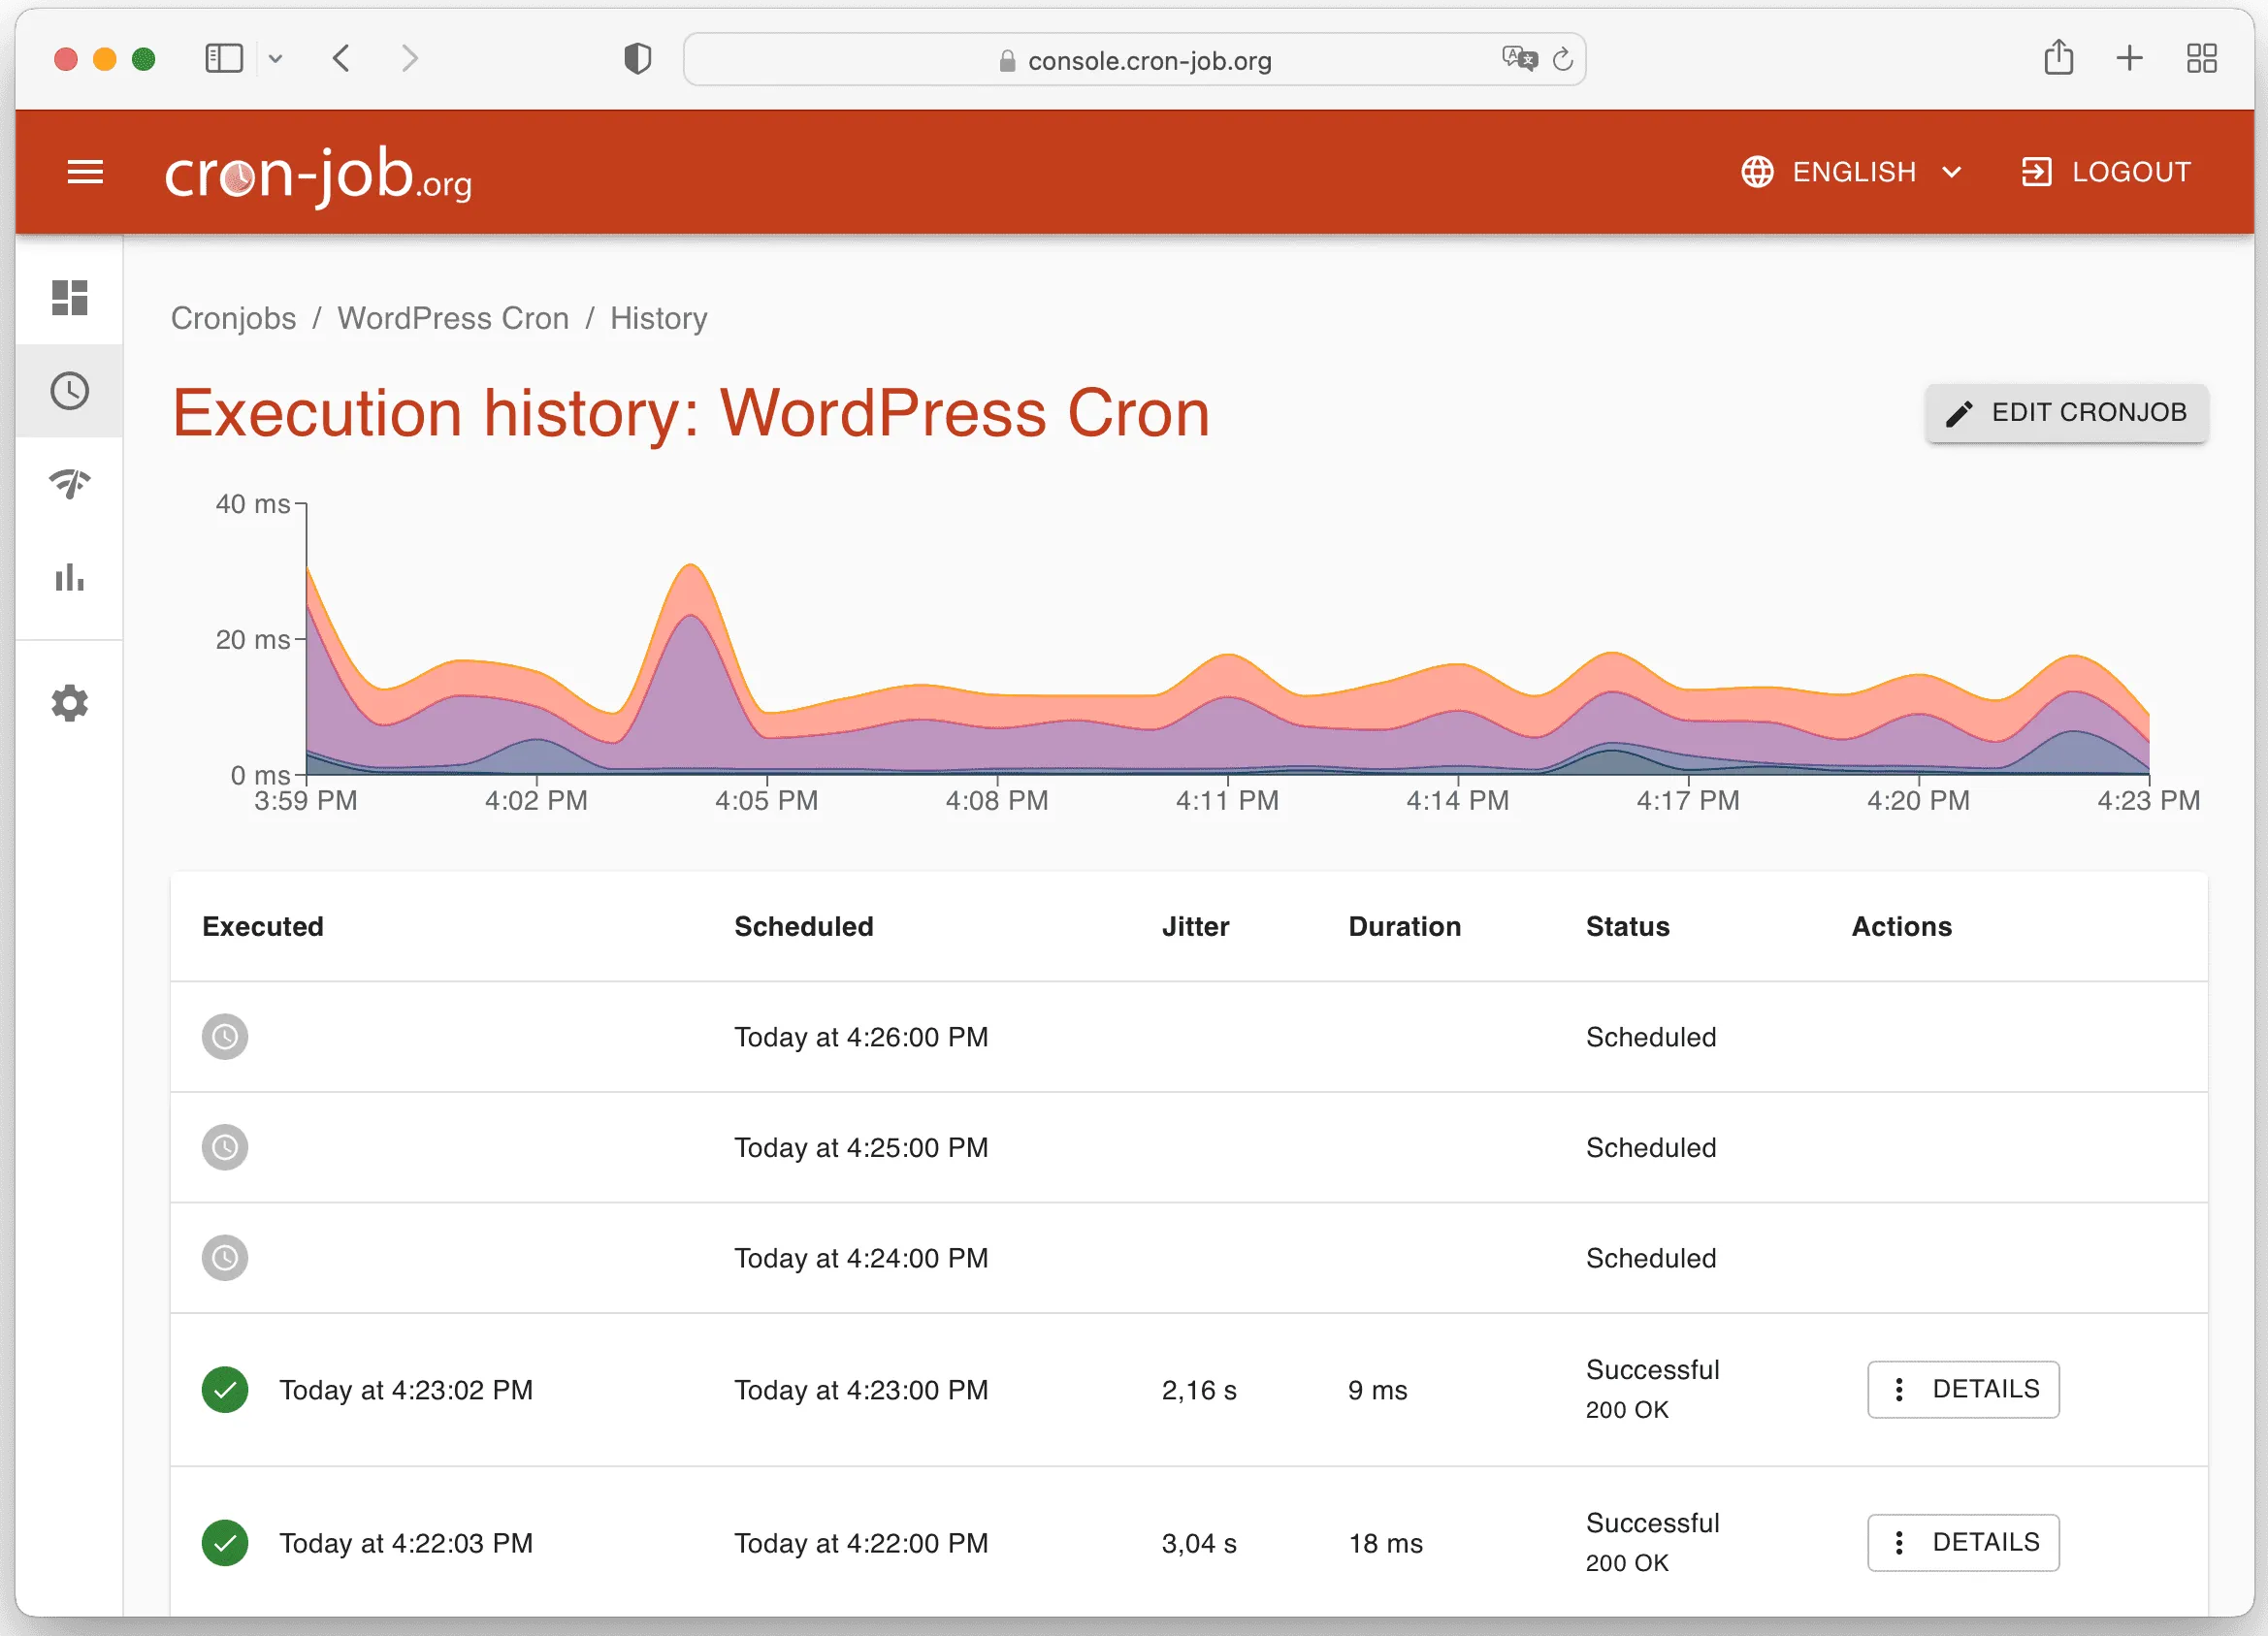
curl -s "https://yourdomain.com/wp-cron.php?doing_wp_cron"Next, click the Add New Cron Job button, and you will see the new cron job added to the list.
Here, we trigger scheduled tasks to run at configured times via wp-cron.php instead of someone having to visit your site at a random time.
Setting up a cron job using a third-party service
If your hosting control panel doesn’t have cron jobs, or you prefer an easier way, you can use third-party services for this purpose.
These are third-party services that let you schedule and manage cron jobs through an easy-to-use interface. Here are some popular options:
- cron-job.org: a free service
- EasyCron: has free tier that offers up-to 200 executions per day (EPD)
- Cronitor: has free tier
Each provider has slightly different user interface.
Simply, Add a Cron with the following command and your preferred timing option.
Make sure to replace “https://yourdomain.com” with your website’s URL
Bonus Tip
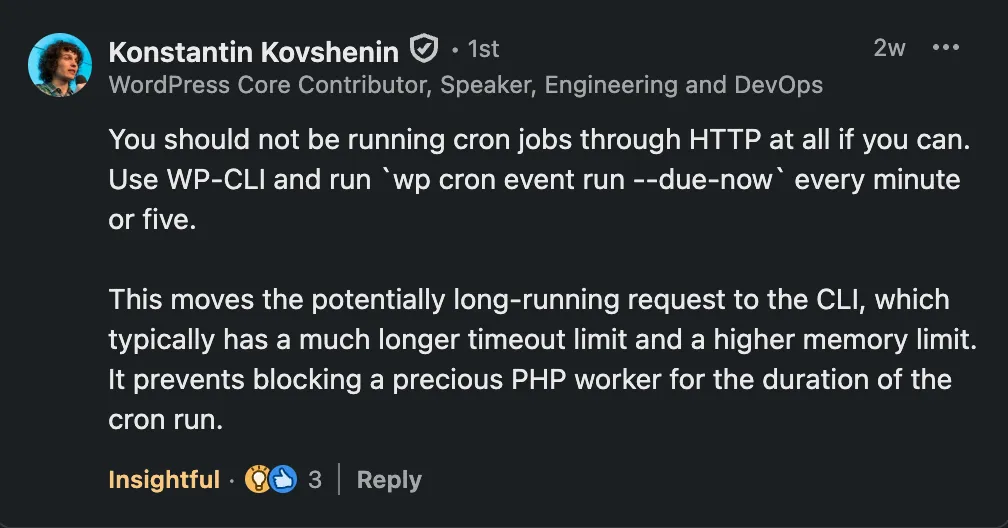
When I posted about this topic in my LinkedIn account, I’ve received a very valuable and insightful comment from one of my friends, Konstantin Kovshenin (WordPress Core Contributor and speaker), stating that:
You should not be running cron jobs through HTTP at all if you can. Use WP-CLI and run ‘wp cron event run –due-now’ every minute or five. This moves the potentially long-running request to the CLI, which typically has a much longer timeout limit and a higher memory limit. It prevents blocking a precious PHP worker for the duration of the cron run.
Key Takeaway
The best performing WordPress sites don’t rely on WP-Cron. Ten minutes of setup time now saves you headaches and keeps your site running smoothly.
Need help with the setup?
If you would like our WordPress experts to handle the WP-Cron setup for you, you can purchase a one-off service for $59 at Fix My WordPress Website.